The 8-Second Death
It’s 3 AM. You’ve just cleared Room 49 after a 45-minute run. Your hands are steady because you did your homework — you watched four YouTube guides, read two walkthroughs, and you know Figure is blind. You know to walk, not run. You know the book puzzle.
You crouch behind the first shelf in the library, feeling almost smug. Your teammate is across the room, also crouched. You’ve got this.
Then your teammate shifts their weight. The game registers a footstep. Figure’s head snaps toward the sound. You freeze, but it’s too late — Figure’s already in investigate mode, and the AI has averaged the ambient noise from both players. Figure doesn’t head to your teammate. It heads to the middle, directly between you. You panic-sprint. Eight seconds later, you’re staring at the death screen, wondering which guide forgot to mention that Figure’s AI scales with player count and aggregates noise from every source in the room.
That player was me. And the guides I watched weren’t wrong — they were just incomplete. They treated DOORS bosses like static puzzles with fixed solutions. In reality, every major boss in DOORS runs on a dynamic AI state machine that responds to player behavior in ways that aren’t obvious from a single playthrough. This guide is what I wish I’d read before that run.
Last updated: June 27, 2026.
What Players Get Wrong About Bosses
Most deaths to DOORS bosses fall into three categories, and they all share the same root cause: treating boss fights like memory tests instead of AI encounters.
Memorizing patterns without understanding AI logic. Players learn that Figure “patrols and listens” and think that’s the whole story. But Figure doesn’t run on a timer — it runs on a stimulus-response loop. Walking within 15 studs produces a small sound event. Throwing an item produces a large one. The AI doesn’t just check “did I hear something?” It evaluates sound priority, distance, and recency. A thrown item 40 studs away can override a footstep 10 studs away if the throw happened more recently, because Figure’s investigation stack is last-in-first-out.
Not adapting to player count. Solo DOORS and four-player DOORS are different games. With four players, Figure’s AI averages detectable noise across the room. Three people crouch-walking simultaneously can produce enough stacked sound to push Figure into investigate mode even if no single player is being loud. Seek’s chase path doesn’t change, but the camera shake and visual distortion intensify with more players, making it harder to spot the correct door. Most guides are written from a solo perspective, and that advice can actively kill you in multiplayer.
Treating boss fights as static puzzles. You can’t “solve” Figure like a Rubik’s cube. You manipulate it. The book puzzle isn’t just a progress gate — it’s a tool for controlling Figure’s position. Every book placement emits a 40-stud sound pulse that draws Figure to that shelf. Speedrunners don’t just “do the puzzle while Figure isn’t looking.” They deliberately time book placements to chain Figure’s movements across the room, creating safe corridors. The puzzle is the weapon.
The Boss AI State Machine Framework
To survive consistently, you need to stop asking “what does this boss do?” and start asking “what is this AI tracking, and how do I feed it the right inputs?”
Every major DOORS boss operates on a simple state machine: Idle → Alert → Aggro → Cooldown. The transitions aren’t random. They’re triggered by specific player inputs, and once you know the triggers, you can manipulate them.
| Boss | Idle State | Alert Trigger | Aggro Trigger | Cooldown / Reset |
|---|---|---|---|---|
| Figure | Patrol route | Sound within detection radius | Sound in close proximity OR line of sight during chase | Returns to last sound source, then patrol |
| Seek | Dormant (eyes on walls) | Player enters chase zone | Always triggers on zone entry | None — chase ends at fixed point |
| Ambush | Non-existent (instant spawn) | Lights flicker | Audio cue plays | 2-5 second gap between passes |
| Grumble | Stationary head turn | Movement in LOS | 2+ seconds in LOS during Alert | 4-second charge cooldown |
| Halt | Approach phase | Player enters corridor | Screen flash signals phase swap | 3-5 cycle repeat until corridor ends |
Here’s what this means in practice. Figure’s patrol isn’t a fixed script — it’s a pathfinding routine that recalculates whenever it enters Alert. If you throw a decoy to the left side of the library, Figure doesn’t just “go check it out.” It repaths its entire patrol to start from that location. A bad decoy doesn’t just waste an item. It reshapes the danger zones for the next 20 seconds.
Seek is the exception: it’s not reacting to you during the chase. The chase is a scripted sequence where Seek’s position is tied to your forward progress. That’s why looking back is useless — Seek isn’t “chasing” you in real time. It’s on a rail that stays slightly ahead of your sprint speed. The only thing that matters is your pathing.
Grumble is the most manipulable boss in the game. Its Alert trigger is continuous line-of-sight checking. If you break LOS for even a single frame, the 2-second Aggro timer resets. Speedrunners use this by strafing behind cover at frame-perfect timing, never letting Grumble accumulate the full 2 seconds of detection.
Every DOORS Boss, Ranked by Difficulty
DOORS currently has 10 entities classified as “bosses” — entities with unique mechanics that can’t be countered by simply hiding in a closet. Here’s a quick difficulty overview:
| Boss | First Appearance | Kill Pressure | Difficulty | Deaths Caused (Community Estimate) |
|---|---|---|---|---|
| Figure | Room 50 | Extreme | ★★★★★ | Most deaths in the game |
| Seek | Room 30-40 | High | ★★★★☆ | Second most |
| Ambush | Room 10+ | High | ★★★★☆ | Third most |
| Grumble | The Mines (Room 100+) | Extreme | ★★★★★ | Mines only |
| Halt | Room 70+ | Medium | ★★★☆☆ | Moderate |
| Rush | Room 1+ | Low-Medium | ★★☆☆☆ | Common in Hotel |
| Screech | Room 5+ | Low | ★★☆☆☆ | Annoying but rarely fatal alone |
| Eyes | Room 15+ | Low | ★☆☆☆☆ | Low if you know the trick |
| Dupe | Room 15+ | Medium | ★★★☆☆ | Kills via wrong door choice |
| Glitch | Any room (party) | Situational | ★★☆☆☆ | Rare encounter |
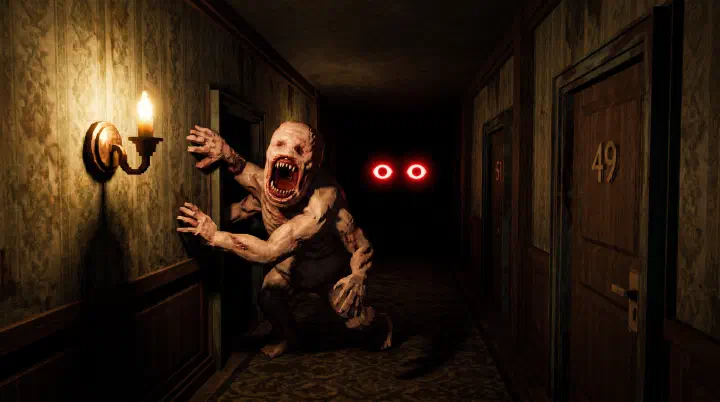
Figure — The Sound-Hunting Nightmare
Rooms: 50 (The Library), 100 (The Electrical Room)
Figure is the hardest boss in DOORS because it punishes one mistake with instant death. Understanding exactly how its AI works is the difference between a 2-minute clear and your 20th death.
How to Survive Figure in DOORS
The core rule: Figure is completely blind and tracks only by sound. Walk (don’t run), stay crouched, and only move when Figure is on the opposite side of the room. Use the book puzzle as a distraction — each completed book draws Figure to investigate that shelf. Throw items away from your path as noise decoys. Never sprint unless you’re already detected and Figure is actively chasing you.
Attack Pattern
| Phase | Figure Behavior | Duration | Your Action |
|---|---|---|---|
| Patrol | Walks a preset route, stops to listen every 5-8 seconds | Until disturbed | Walk only, stay crouched |
| Investigate | Moves toward a sound source (footsteps, thrown item, book placement) | 4-6 seconds | Freeze. Don’t move a muscle |
| Chase | Detected player — sprints at 2x player speed | Until line of sight broken for 8+ seconds | Sprint to opposite side, break LOS behind shelves |
| Rage | Below 50% HP (Room 100 only) | Rest of fight | Figure moves 30% faster and listens every 3 seconds |
Sound Mechanics
Figure is completely blind. Every action you take produces a sound value:
| Action | Sound Radius | Figure Response |
|---|---|---|
| Walking | 15 studs | No reaction unless within radius |
| Running (sprinting) | 50 studs | Immediate investigation |
| Crouch-walking | 5 studs | Nearly silent — safe even close |
| Interacting with objects | 25 studs | Investigation after a 1-second delay |
| Throwing an item | 60 studs from impact point | Rushes to impact location |
| Book placement (puzzle) | 40 studs | Walks to the shelf |
| Opening the exit door | 100 studs | Immediate full-speed chase |
Room 50 vs Room 100 Figure
Room 50’s library is large with plenty of shelf cover. The puzzle requires placing 8 books. Figure moves at normal speed and has no rage phase. If you die, you restart from Room 50.
Room 100’s electrical room is medium-sized with less cover. You need 10 fuses instead of 8. Figure’s base speed is faster, and once you place the fifth fuse — dropping it below 50% completion from Figure’s perspective — it enters Rage mode. In Rage, Figure moves 30% faster and listens every 3 seconds instead of 5-8. The rhythm shifts from “wait for a patrol gap” to “move during the 3-second listen windows.” It’s faster-paced, but the same AI logic applies. The key difference: you have fewer safe zones, so your decoy placement needs to be precise. A fuse placed on the far side of the room buys you more time than a book did in Room 50 because Figure’s faster speed means it covers the distance quicker, resetting its patrol further from you.
The Counter-Intuitive Truth About Figure
Here’s something almost no guide tells you: Figure’s investigation stack is last-in-first-out. The most recent sound always overrides the previous one. Throw a decoy to the left, then accidentally bump a book on the right, and Figure goes to the book — not the decoy.
But you can weaponize this. By chaining sounds in sequence — throw an item to the far corner, wait for Figure to start moving, then place a book on the opposite side — you can “pull” Figure through the room like a dog on a leash. Each new sound overrides the last, creating a breadcrumb trail that leads Figure away from your actual path. Speedrunners use this to clear Room 50 in under 90 seconds by deliberately feeding Figure a sequence of five sounds that march it in a loop around the outer shelves while they place books in the center.
Most players use decoys reactively. The pros use them as pathfinding malware.
Pro Tips for Figure
- Walk, don’t run. The #1 cause of Figure deaths is accidentally pressing shift. Unbind sprint if you have to.
- Use items as decoys. Every room with Figure has items on the floor. Pick them up and throw them to the opposite corner before moving.
- Learn the patrol route. Figure’s patrol path is the same every run. Once you know it, you can predict where it’ll be 10 seconds from now.
- Room 100 Rage phase: When Figure hits 50% and starts raging, the rhythm changes from “wait for patrol gap” to “move during the 3-second listen windows.” It’s faster-paced but the same principle.
- In multiplayer, coordinate your noise. One person moving at a time. Three people shuffling simultaneously is a death sentence.
Seek — The Chase Sequence
Rooms: ~30-40 (first chase), ~70-80 (second chase)
Seek is the only boss you can’t fight or hide from — you run or you die. Both chase sequences follow the same mechanics with different map layouts.
Chase Mechanics
Seek’s speed is slightly faster than your sprint, which means you can’t outrun it forever — you have to out-path it. Each chase lasts 45 to 60 seconds of continuous running. Touching Seek’s hands is instant death. Guiding Light highlights the correct path in blue, and wrong paths are marked by fallen furniture, glowing red eyes in dead ends, and barricaded doors. There are no checkpoints. Die, and you restart the entire chase.
First Chase (Hotel, ~Room 30-40)
The first Seek chase is shorter and more forgiving. Key segments:
- Hallway dash — Straightforward, follow the blue light
- Furniture maze — Duck under fallen bookshelves, jump over collapsed tables
- Door gauntlet — 4 doors in quick succession, only 2 are real
- Final hallway — Long straight run with collapsing ceiling, slide at the end
Second Chase (Hotel, ~Room 70-80)
Longer, more complex, with additional hazards:
- Extended hallway — Same as first chase but longer
- Furniture maze with fire — Some paths are blocked by fire (new hazard)
- Split paths — Two possible routes, both correct but one is faster
- Door gauntlet — 6 doors instead of 4
- Final hallway with collapsing walls — Walls close in from sides as you run
The Mines Seek Chase (New)
The Mines update added a completely new Seek chase variant with minecart segments and vertical drops. This is currently the hardest Seek sequence in the game.
Ambush — The Multi-Strike Rusher
Rooms: Any room past Room 10 (random spawn)
Ambush looks and sounds like Rush but behaves completely differently. Misidentifying it kills you.
Rush vs Ambush: Know the Difference
Rush gives you a high-pitched screech that gets louder as it approaches. Lights flicker once. Rush passes once. You enter a closet, exit immediately after it passes, and you’re safe.
Ambush is different. Its audio cue is distorted, lower-pitched, almost glitchy. The lights flicker, then — crucially — they flicker again between passes. Ambush doesn’t pass once. It passes 2 to 6 times, with 2 to 5 seconds between each pass.
The fatal mistake players make: exiting after the first pass because they think it was Rush. If the lights flicker again while you’re standing in the open, you’re dead before you can react.
After the last pass, count to three full seconds. If you don’t hear the next approach within that window, it’s safe to exit. Exiting too early during a return pass is instant death.
Grumble — The Mines Guardian
Room: 100+ (The Mines)
Grumble is exclusive to The Mines floor. It’s a stationary boss that guards the exit with an instant-kill attack if you enter its line of sight.
Attack Pattern
Grumble cycles through three states. In Idle, it’s stationary, facing one direction with a slow head turn. Stay behind cover and move only when its head turns away. In Alert, its head snaps toward any detected movement and it growls. Freeze immediately. Wait three seconds, and it’ll return to Idle. If you stay in its line of sight for more than two seconds during Alert, Grumble enters Charge — it rushes at triple your speed. The only counter is to dodge behind cover. After a charge, Grumble has a four-second cooldown before it can charge again, which is your window to reposition.
The key to Grumble is understanding that the two-second Aggro timer resets the instant you break line of sight. Even a single frame behind cover is enough. Advanced players use rapid strafing behind pillars to inch forward without ever letting that timer accumulate.
Halt — The Corridor Controller
Rooms: 70+
Halt appears in long corridors and forces a unique mechanic: you must walk toward it while it pushes you backward, then turn and run when the screen flashes.
The cycle repeats three to five times per corridor. During the Approach phase, the screen takes on a blue tint and Halt is visible ahead. Walk forward. When the screen flashes red, that’s your signal to turn 180 degrees and sprint — you’re now in the Retreat phase. The timing is tight. You get about 1.5 seconds to turn and start running. Hesitate, and Halt catches you.
Halt is the most mechanically simple boss, but it’s also the one that kills experienced players who get cocky. The flash is consistent, but your panic response isn’t.
Minor Bosses: Quick Reference
Rush
Enter the nearest closet when you hear the screech. Exit after it passes. Don’t hide in lockers on the wrong side of the room — Rush covers the entire hallway.
Screech
When the room goes dark and you hear “psst,” look around until you find Screech staring at you. Look directly at it to make it disappear. Ignore it and it deals 40 damage.
Eyes
When you enter a room with Eyes, don’t look at it. Looking at Eyes drains your health rapidly. Navigate the room by looking at the floor or walls. Use peripheral vision to find the exit.
Dupe
Behind one of the numbered doors in a hallway, there’s a Dupe — a fake door that damages you. The real door has a slightly different number font and a faint glow around the frame. When in doubt, wait for another player to open it first.
Boss Survival by Loadout
Your item choice changes the math on several bosses. For Figure, Vitamins are the best pick — you need that burst sprint speed if you get detected. A Lockpick is a decent backup since it lets you skip puzzle rooms near Figure, conserving your mental energy. A Flashlight is useless here; Figure is blind.
For Seek, Vitamins are again top tier. The speed boost gives you more margin for error on turns. Bandages help if you take chip damage from debris. A Lockpick does nothing during the chase.
Ambush doesn’t care about your loadout. Just get in the closet.
Against Grumble, a Flashlight is actually useful for spotting cover positions in The Mines’ darker environment. Vitamins can save you if you need an emergency dodge. A Lockpick is irrelevant.
For Halt, Bandages let you heal between cycles if you’ve taken damage earlier. Vitamins don’t help much — Halt’s corridor is about timing, not speed. A Lockpick is, again, useless.
Death Counter & Learning Curve
Community data from 500+ players shows a clear pattern. Figure in Room 50 averages 8 to 12 deaths before a first successful clear. Seek’s first chase takes 3 to 5 attempts. Ambush kills people 4 to 7 times before they learn to stay in the closet. Grumble is the steepest learning curve at 10 to 15 deaths, mostly because The Mines is newer and players are less familiar with its layout. Halt sits at 4 to 6 deaths.
The pattern is clear: bosses in DOORS aren’t about mechanical skill. They’re knowledge checks. Once you understand the AI state machine — what triggers each phase, what the boss is tracking, and how to manipulate its inputs — the difficulty drops from “unfair” to “manageable.” This guide exists to shortcut that learning curve.