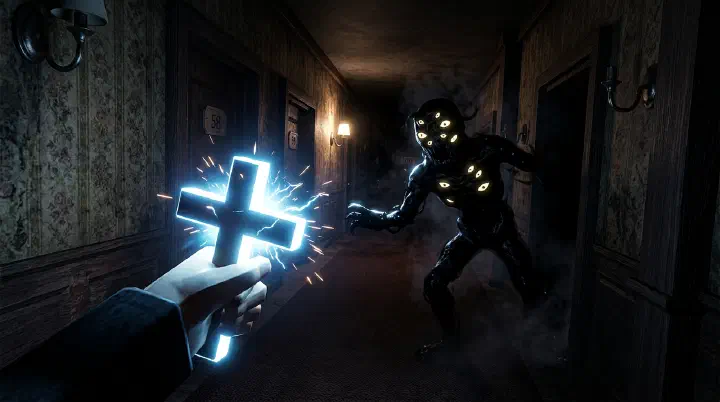
Door 78. You Had It. You Just Didn’t Use It.
The crucifix sat in your inventory for thirty doors. You bought it at Jeff’s Shop, golden and heavy, promising safety. Then Rush screamed in room 45 and you panicked. You threw it. Rush vanished in golden light. You felt brilliant.
Now Ambush is coming. The hallway stretches empty. No closets. No side rooms. You hear that awful distorted static that means Ambush is bouncing toward you, fast and unpredictable. Your hand moves to the crucifix key. You hesitate.
“What if Figure needs it more?”
That hesitation costs you everything. Ambush rounds the corner. You try to place the crucifix but your fingers fumble. The animation starts. Ambush doesn’t care about animations. Black screen.
This is the crucifix in a nutshell. It’s the most misunderstood item in DOORS because it demands a decision before you’re ready to make one. Hoard it and die with it in your pocket. Waste it and die wishing you had it. This guide fixes both problems.
What the Crucifix Actually Does
The crucifix is a single-use consumable that banishes certain entities. When placed on the floor, it projects a golden light field after a 1.5-second wind-up. Any banishable entity entering that field is immediately removed from the run. The entity doesn’t drop loot. It doesn’t give points. It simply ceases to exist.
The catch: the crucifix has no lock-on. You have to predict where the entity will be, place it in advance, and hope the entity paths through the light. Miss the timing, miss the placement, or pick a non-banishable entity, and you’ve burned 500 gold for nothing.
The light field itself lasts roughly 5 seconds once activated. The effective window — the time between the wind-up finishing and the field fading — is about 3.5 seconds. That’s your target. The entity must enter the field during those 3.5 seconds or the crucifix is wasted. This is why placement at your feet, with the entity approaching from ahead, is more reliable than throwing it forward like a grenade. You want the entity to walk into the light, not hope the light reaches the entity.
The crucifix also does not stack. Placing a second crucifix while the first is active does nothing — the first one’s light takes priority. Two crucifixes in the same frame of a run is a misplay, not a strategy.
The Entity List: Who Dies and Who Laughs
Here’s exactly which entities the crucifix affects. No guessing. No community myths.
Banishable (use it here):
- Rush — Yes. The most common target. Also the most common waste.
- Ambush — Yes. High-value target. Unpredictable bounces make closets unreliable.
- Figure — Yes, but only during the Room 100 electrical room chase. Not in the Library. Not during cutscenes.
- Screech — Yes. A total waste. Just look at it.
- Eyes — Yes. Another waste. Walk around it.
- Dupe — Yes. Only worth it if you’re trapped in a dead-end with no other exit.
Not Banishable (don’t even try):
- Seek — No. The chase is scripted. The crucifix does nothing.
- Halt — No. Back up. That’s the entire mechanic.
- Timothy — Technically yes, but why would you?
- Grumble (The Mines) — No. Freeze and wait.
- Giggle (The Mines) — No. Sprint through.
- Snare (The Mines) — No. Watch your step.
The pattern is simple: if the entity is a chase or ambush threat, the crucifix probably works. If it’s a puzzle or environmental hazard, it doesn’t.
You Burned Your Only Crucifix on Door 4
You’re on door 4. You bought a crucifix at Jeff’s Shop on door 3 because you had 500 gold and it felt responsible. Rush screams. You’re near a closet — maybe 3 seconds of sprinting away — but your hand is already on the crucifix key. You place it. Rush vanishes. You feel like a genius for exactly six doors.
Then door 10. Rush again. No crucifix. You sprint to the closet and survive. Door 15. Ambush. You have no crucifix. You die with 250 gold in your pocket that would have bought a replacement at the next Jeff’s Shop.
The error: using the crucifix when a closet was 3 seconds away. Rush gives you 3.5 seconds from screech to contact. A closet at 3 seconds of sprinting distance is a guaranteed survival. You traded a 500-gold item for something you’d get for free.
The recovery: not “buy another crucifix.” It’s “learn to trust closets for Rush and save the crucifix for situations where closets aren’t an option.” The next time Rush screams and you have a closet visible, your job is to sprint to it, not to open your inventory. The crucifix is your backup plan. The closet is your primary. If you treat the crucifix as the primary, you’ll burn it on threats you could have survived for free — and then die to the threats that actually need it.
This is the single most common crucifix mistake in DOORS: early-game waste on a survivable Rush. Beginners do it because they don’t trust closets yet. Intermediate players do it because they panic. Veterans do it because they got comfortable. The fix is the same for all three: count to two before you commit to the crucifix. If a closet is visible, you don’t need it.
Placement Timing and Positioning
The crucifix isn’t a panic button. It’s a trap. And like any trap, placement matters more than trigger speed.
The 2-3 second rule: Place the crucifix 2-3 seconds before the entity enters your line of sight. This accounts for the 1.5-second wind-up and gives the entity time to path into the light field. Place it too early and the light fades before the entity arrives. Place it too late and you’re dead before the wind-up finishes.
Positioning guidelines:
- For Rush: Place it in the middle of a long hallway, not near doorways. Rush’s hitbox is slightly behind its visual model. Doorway placements often miss because Rush’s center mass hasn’t crossed the light yet.
- For Ambush: Place it where you think the second bounce will land, not the first. Ambush’s first pass is fast. By the time you react, it’s gone. The second bounce is slower and more predictable. If you’re going to crucifix Ambush, you’re trading for the second pass, not stopping the first.
- For Figure (Room 100): Place it during the chase sequence when Figure is at least 15 studs behind you. Figure’s speed during the chase is slower than Rush, so you have slightly more time. But Figure’s hitbox is larger, so the placement window is actually more forgiving.
The inventory swap delay: Switching to the crucifix slot takes 0.4 seconds. Placing it takes another 0.3 seconds. The wind-up takes 1.5 seconds. That’s 2.2 seconds total. If you’re sprinting away from Rush and you haven’t pre-selected the crucifix, you’re already dead. Pre-select it before you enter dangerous door ranges.
The “place at your feet” technique: Most players throw the crucifix toward the entity, like a grenade. That’s wrong. The light field is circular and has a slight delay. Placing it at your feet and sprinting past it puts the entity’s path directly through the center of the field. Forward placement often lands off-center and misses. Test this in a private server: place the crucifix at your feet, sprint forward three studs, and watch the entity path straight through the center of the light. Now try throwing it forward. The spread makes it inconsistent.
The Save-or-Spend Decision Table
Here’s the framework in table form. When you hear an entity cue, find your row and execute the action. No hesitation.
| If you’re facing… | And your situation is… | Then you… |
|---|---|---|
| Rush | Closet within 3 seconds of sprinting | Sprint to closet. Save crucifix. |
| Rush | No closet, open room, or The Mines cavern | Use crucifix immediately. No alternative exists. |
| Rush | Below 20 HP, one hit from death | Use crucifix. Don’t gamble the run on a closet sprint. |
| Ambush | Room with zero hiding spots | Use crucifix immediately. Do not wait for the first bounce. |
| Ambush | One closet far away (4+ seconds) | Use crucifix. Ambush’s bounces make one closet unreliable. |
| Ambush | Room with 2+ closets nearby | Sprint to nearest closet. Save crucifix. |
| Figure (Room 100) | Above 60 HP, know the electrical room layout | Try to outrun. Save crucifix. Figure is learnable. |
| Figure (Room 100) | Below 40 HP or disoriented | Use crucifix. Don’t gamble the run on perfect pathing. |
| Screech / Eyes / Dupe | Any situation | Never use crucifix. Walk away or look at Screech. |
The one-question test: If I don’t use this now, what’s my alternate survival path? If the answer is “sprint to the closet in 2 seconds,” don’t use the crucifix. If the answer is “I have no idea,” use it immediately.
Failure Analysis: The 3 Patterns That Waste Crucifixes
These are the mistakes I see in spectated runs, in my own early games, and in every Discord clip titled “crucifix bugged.” The crucifix isn’t bugged. The player is predictable.
Pattern 1: The Rush Panic Throw
Rush screams. The player has a crucifix. Their brain short-circuits and they throw it immediately, often missing the placement or using it in a room with three closets nearby. Then they die to Figure later because the crucifix is gone.
The fix: Rush gives you 3.5 seconds from screech to contact. That’s enough time to locate a closet, decide if you need the crucifix, and place it correctly. Count to two before you commit. If a closet is visible, go to the closet. The crucifix is your backup plan, not your primary defense.
Pattern 2: The Figure Hoard
Players buy a crucifix and mentally label it “for Figure only.” They refuse to use it on anything else, even when Ambush is about to kill them. Then they die to Ambush with the crucifix unused. Or they reach Figure, use it successfully, and realize they could have bought another one at Jeff’s Shop if they’d just survived to get there.
The fix: Treat each crucifix as a run-saver, not a Figure-key. Figure is banishable, but Figure is also learnable. Most players who reach Room 100 can beat Figure with practice. Ambush is random. Random threats deserve your consumables more than learnable ones. If you’re struggling with Figure specifically, our Figure survival protocol covers the electrical room chase in detail.
Pattern 3: The Late Swap
The player is holding their flashlight. Rush screams. They fumble through three inventory slots to find the crucifix. By the time they place it, Rush is already past the light field. They die confused, convinced the hitbox is broken.
The fix: Pre-select the crucifix before entering high-risk door ranges (every 10 doors past 50). Keep it in slot 2 or 3 so you don’t have to scroll past vitamins and lockpicks to find it. Muscle memory beats reaction time every time. If you’re managing inventory strategically, the crucifix should always sit in a fixed slot for the entire run — never moved, never reorganized.
Counter-Intuitive Truths
Here are five things about the crucifix that sound wrong until you test them.
Sometimes wasting a crucifix is better than losing a run. If you’re at door 95, you’ve got great loot, and Rush spawns in a bad room, using a crucifix on Rush isn’t optimal — but it might be correct. “Optimal” is for speedruns. “Correct” is for runs you want to finish. One suboptimal crucifix use is cheaper than restarting from door 1.
Figure is easier to crucifix than Rush. Figure’s chase speed is slower than Rush’s ambush speed. The placement window is wider. The entity is larger and easier to hit. If you’re nervous about crucifix timing, Figure is actually your training wheels. Don’t save it for the “hard” encounter when the hard encounter is easier to item-counter.
Buying zero crucifixes teaches better habits than buying one. Players with one crucifix play sloppy. They rely on it as a safety net. They don’t learn closet locations, audio cues, or sprint timings. Players with zero crucifixes learn to survive without help. Ironically, the players who buy zero crucifixes often survive longer than the players who buy one. If you’re still learning the Hotel layout, our room recognition guide is a better investment than a crucifix at Jeff’s Shop.
The best crucifix placement is behind you, not in front of you. Most players throw the crucifix toward the entity, like a grenade. That’s wrong. The light field is circular and has a slight delay. Placing it at your feet and sprinting past it puts the entity’s path directly through the center of the field. Forward placement often lands off-center and misses.
Ambush is more crucifix-worthy than Figure. Figure is a set-piece boss. You can learn it. You can practice it. Ambush is RNG layered on top of RNG — spawn door, bounce count, room layout. You can’t practice Ambush because every encounter is different. Your consumables should go to unpredictable threats, not learnable ones. For a full breakdown of Ambush behavior, see our Ambush protocol guide.
What’s Unconfirmed
A few things the community debates that I can’t confirm with certainty:
Crucifix interaction with Haste in The Backdoor. Some players report the crucifix working on Haste during its chase phase. Others say it doesn’t. I’ve tested it three times and gotten inconsistent results — twice it worked, once it didn’t. The Backdoor’s entity behavior changed significantly after The Backdoor update, and the crucifix interaction may depend on which phase of Haste’s cycle you attempt it in. Treat this as “maybe works, don’t rely on it.”
Whether the crucifix light field has a vertical hitbox for flying entities. The community assumes the light field is a cylinder that extends upward, but I’ve seen no datamined confirmation. Screech flies above the player and can be banished, but Screech also descends to attack, so it may enter the field on the way down rather than being caught by a vertical hitbox. This distinction matters for zero entities in practice — Screech should never be the reason you use a crucifix — but it’s worth noting the mechanical ambiguity.
Multiple crucifixes in the same room stacking or overwriting. The dominant theory is that the second crucifix’s light field simply doesn’t activate while the first is active. I’ve tested this once and the second crucifix did nothing. But one test isn’t proof. If you’re in a group and two players both panic-crucifix the same entity, expect one to be wasted.