The Door 1 Wipe That Should Be Impossible
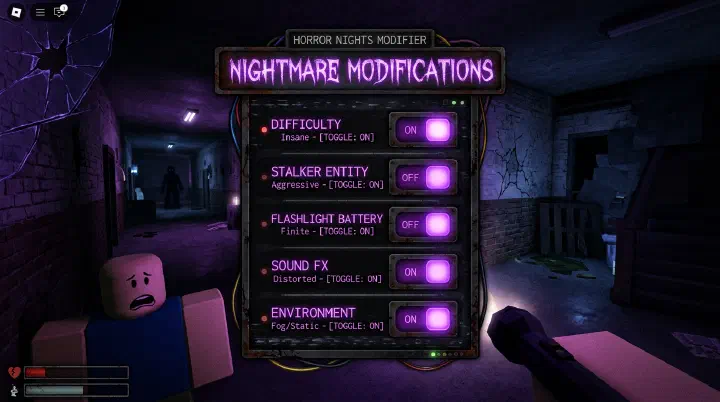
You just unlocked modifiers and the menu is glowing. You’re greedy. You read “Bad Time” and think okay, sure, bad time, I’ve had bad times before. You click “Wet Floor” because slippery sounds funny. You click “El Goblino Was Here” because it sounds like a joke modifier. The multiplier ticks up to 3.4x and you grin — that’s triple knobs for what feels like nothing.
You spawn in. You take three steps toward Door 1, and the lights flicker. You haven’t even looted the first dresser. Rush is already coming. You sprint toward the closet on your left and your character skids a full meter past it because Wet Floor is on. You correct, double-back, and the closet door is jammed — El Goblino Was Here scattered debris in front of every hiding spot in the first ten rooms. You die at Door 1 of a 100-door run, with a 3.4x multiplier that you never collected, watching Rush phase through the wall where a closet used to be usable.
This is the modifier trap. The game lets you stack anything against anything. It doesn’t warn you that Wet Floor’s stopping distance plus El Goblino’s blocked closets means you literally cannot hide from Rush in the rooms you’re statistically most likely to meet him in. It lets you turn the knob multiplier up to 13x and walk straight into a configuration where the run is mathematically unwinnable, then it laughs and gives you zero knobs because a failed run pays nothing regardless of how brave the multiplier looked.
Modifiers are not a difficulty slider. They’re a system of interacting rules, and some interactions don’t add up — they cascade. This guide is about which combos are actually free knobs, which combos are death traps disguised as easy mode, and how to build a loadout that survives long enough to bank the multiplier.
If you’re still learning Hotel basics, read the DOORS Beginner Guide first. Modifiers amplify every mistake you don’t know you’re making.
Why Stacking “Easy” Modifiers Kills You
Every modifier in DOORS has a printed effect and an unprinted effect. The printed effect is what the menu tells you — Wet Floor makes you slippery, El Goblino’s Payback spawns Screech more. The unprinted effect is how it interacts with every other system in the game: hiding mechanics, entity sightlines, audio cues, item economy. New players read the printed effects and add them up. Veterans read the interactions and multiply them.
Here’s what’s actually happening when “easy” modifiers go bad together.
Wet Floor + any entity modifier = unreachable hiding spots. Closets and beds in DOORS have a small interaction radius. Your character has to be inside that radius and stop moving to enter. Wet Floor extends your stopping distance by roughly 50%, which sounds harmless until you realize that under Rush — where you have maybe 1.5 seconds to commit to a closet — you will overshoot the closet by half a body length and re-enter the hallway just as Rush arrives. The modifier didn’t make you slower. It made the hiding system itself unusable under time pressure.
El Goblino’s Payback + Bad Ventilation = no safe rooms. Bad Ventilation spawns Rush more often. El Goblino’s Payback spawns Screech in rooms Screech normally avoids. Individually, both are tolerable. Together, the early Hotel (rooms 1-20), which is normally your safe looting zone, becomes a place where you cannot stand still long enough to open a single drawer without something attacking you. The economy of the run collapses — you reach Door 50 with no lockpicks, no batteries, no vitamins, because you never had ten consecutive seconds to search.
Rent’s Due + Lights Out = battery starvation spiral. Rent’s Due cuts item spawns by 60%, including batteries. Lights Out makes your flashlight critical and drains it constantly. The math: your flashlight has maybe 90 seconds of life total. A Hotel run takes 25-40 minutes. You will run out of light around Door 30, and the remaining 70 doors will be played in total darkness with no flashlight to find batteries that aren’t there anyway. The two modifiers each cost 1.5x. Their interaction costs the run.
Soundproofed + anything fast = first-hit deaths. Most DOORS deaths are recoverable — you take damage, hide, heal, continue. Soundproofed removes your audio warning, which means you don’t react to Rush until you see him, which means you take the first hit at point-blank distance. Point-blank Rush isn’t a damage source. It’s a kill. Add Last Breath (faster Screech) and the same logic applies to every Screech encounter.
The pattern: any two modifiers that each individually attack a different survival pillar (movement, hiding, vision, audio, items) compound into a configuration where one of those pillars is fully removed. You don’t notice because the multiplier just looks like a number going up.
Modifiers That Are Actually Free
A free modifier is one whose printed cost matches its real cost — no hidden interaction, no cascade. These are the modifiers you can almost always pick up without thinking, as long as you don’t stack them with their specific counter-modifier.
- Wet Floor (1.25x) is free if you play patient. The whole modifier is “stop sooner.” If you brake half a step early and don’t sprint into closets, it costs you nothing. The hidden cost only activates when you combine it with anything that forces snap reactions (Rush-heavy modifiers, the Seek chase under Last Breath).
- Rent’s Due (1.5x) is free if you’re already a thorough looter. Players who skip drawers and rush through rooms feel Rent’s Due hard because their margin for healing was already thin. Players who systematically loot every container barely notice — they were finding enough items at 100% spawn rate, so 40% spawn rate still keeps them topped up.
- Bad Ventilation (1.5x) is free if you play fast. The modifier punishes lingering, so if you already move with purpose and don’t backtrack, the increased Rush spawns just match your existing tempo. It’s secretly easier than Lights Out at the same multiplier because your tools all still work.
Stack any two of these and you get 1.88x or 2.25x for a run that feels almost identical to vanilla. That’s the floor of efficient farming.
The Counter-Intuitive Pick: Soundproofed Solo Is Easier Than Lights Out Solo
Common DOORS advice says Soundproofed is the hardest modifier because audio cues are critical. This is true in multiplayer, where your teammates’ voices replace the missing audio. In solo, it’s backwards.
Lights Out forces you to walk into a fight blind. You don’t see Rush coming, you don’t see Screech’s face appear, you don’t see the door frames vibrating, you don’t see room layouts. Your flashlight battery becomes the run’s resource economy and it runs out.
Soundproofed leaves all your visual tools intact. You can still see Rush’s flickering light approach down the hallway. You can still see Screech’s distortion before he attacks. You can still see the Figure’s movements. What you lose is the early warning — but if you play with your camera consistently sweeping (which experienced players already do), you replace audio warnings with visual ones at minimal cost.
The implication: solo runners who want a high multiplier without going to true Hotel Hell should pick Soundproofed (2.0x) over Lights Out (1.5x). Same approximate difficulty, higher payout. Most guides have this backwards because they’re written from a multiplayer perspective.
Modifier Catalog: What Each One Actually Does
Lights Out (1.5x)
Removes all ambient lighting. Your flashlight and lighter become the only sight you have. The hidden effect: entity spawn checks that suppress Rush and Screech in lit rooms are disabled, so spawn rates effectively rise on top of the visibility loss. Pair it with anything that drains batteries and you starve. Pair it with Soundproofed and you have Hotel Hell.
Bad Ventilation (1.5x)
Rush spawns 40% more often. Ambush more likely to follow Rush. Screech roams wider. This is a tempo modifier — it punishes slow play, not low skill. If you already move efficiently, it’s nearly free. If you like to thoroughly explore every room, it’s brutal.
El Goblino’s Payback (1.5x)
Screech everywhere, including rooms he normally avoids. Look-away reaction window shortened by 0.3 seconds. The danger isn’t the damage — it’s that constant Screech presence breaks your concentration on everything else. You start over-checking corners and miss Rush’s audio cue.
Wet Floor (1.25x)
Movement gets slippery. Stopping distance up ~50%. The lowest multiplier because the printed effect is mild, but the hiding-spot interaction is severe. Avoid stacking with high-pressure modifiers.
Last Breath (1.75x)
Two effects bundled: faster Screech attacks, and the Seek chase extends to 4-5 phases with tighter geometry. The Seek chase is the part that kills people. If you can’t already finish vanilla Seek without using a heal, do not pick Last Breath.
Rent’s Due (1.5x)
Items spawn ~60% less, rare items ~80% less. Forces a damage-avoidance playstyle since you can’t heal your way through mistakes. Pairs poorly with Lights Out (battery starvation) and well with everything else.
Soundproofed (2.0x)
Audio cues dampened across the board. Highest non-stacked multiplier. Solo: easier than its reputation if you camera-sweep. Multiplayer: brutal because team communication is the only audio you have left.
Knob Math: Why Three Modifiers Beats Five
Multipliers stack multiplicatively, not additively. Two 1.5x modifiers give 2.25x, not 3.0x. Three 1.5x modifiers give 3.375x. The curve looks like free money — keep stacking, keep multiplying.
It isn’t. Your completion rate drops faster than the multiplier rises. A 2x run you complete 80% of the time pays more knobs per hour than a 5x run you complete 20% of the time, because failed runs pay zero regardless of multiplier. The optimization isn’t max multiplier — it’s max (multiplier × completion rate).
Knob values by stack:
| Stack | Multiplier | Approx. completion rate (decent player) | Effective knobs/run |
|---|---|---|---|
| Vanilla | 1.0x | 90% | 110 |
| 2 easy mods | 2.25x | 75% | 200 |
| 3 mods (the sweet spot) | 3.0–3.4x | 60% | 230 |
| 5 mods (Not Five Stars) | 7.4x | 20% | 175 |
| Hotel Hell+ | 9–13x | 5% | 80 |
Three modifiers is the efficient frontier for most players. Past that, you’re paying knobs for bragging rights, not gold.
The Loadout Framework
Pick your loadout in this order, not by reading the multiplier first.
- Pick your tempo. Are you playing fast or thorough? Fast picks Bad Ventilation. Thorough picks Rent’s Due. Picking both means your tempo is “panicked” which is not a tempo.
- Pick one sensory loss, maximum. Lights Out, Soundproofed, or neither. Never both unless you’re going for Hotel Hell on purpose.
- Add Wet Floor only if you’re not also adding a snap-reaction modifier. Wet Floor + Lights Out solo: fine. Wet Floor + Last Breath: avoid.
- Last Breath is its own decision. Don’t add it as filler. Add it because you’ve practiced Seek chase and you want the 1.75x.
A clean three-modifier farming loadout: Bad Ventilation + Rent’s Due + Soundproofed = 4.5x. High multiplier, no Lights Out cascade, no Wet Floor hiding-spot trap, no Last Breath Seek extension. The three modifiers attack different pillars (tempo, items, audio) but none of them attacks your ability to hide or your ability to react to what you can see. That’s why it works.
The Hotel Hell Path
Hotel Hell (Lights Out + Soundproofed) is the headline challenge. It’s a 3.0x base, two sensory pillars removed, and is generally considered the hardest non-secret achievement in the game.
If you’re chasing this badge:
- Memorize room layouts from vanilla runs. You navigate Hotel Hell by memory, not by sight.
- Door frame vibration is your single most reliable Rush warning — it’s a visual cue Lights Out doesn’t kill and Soundproofed doesn’t dampen.
- Use the lighter, not the flashlight, in non-critical rooms. Battery economy is the run’s bottleneck.
- For Seek chase, hug the path edges. You can’t see the layout but you can feel the wall.
- For Figure, learn the screen-shake timing. Figure produces visual feedback that survives Soundproofed.
Hotel Hell is easier in coordinated multiplayer than solo, because teammates’ voices substitute for the dampened audio.
For the full secret-and-achievement list, see DOORS Achievements and Secrets.
Room-by-Room Modifier Survival
Different sections of the Hotel react differently to the same modifier. Adjust your awareness accordingly:
- Doors 1-20: Loot economy phase. Rent’s Due hurts most here. Bad Ventilation also bites because you want to linger and search.
- Library: Open sightlines. Bad Ventilation Rush spawns in the Library are statistically the most dangerous in the game. Hug bookshelves.
- Greenhouse (Doors 50-70): Wet Floor’s hard zone. The narrow walkways and forced precise movement turn slippery controls into death. Some players turn Wet Floor off for Greenhouse-focused achievements.
- Seek chase (Doors 70-80): Last Breath’s hard zone. Memorize the chase variants before adding Last Breath, period.
- Figure (Doors 80-100): Soundproofed’s hard zone. Figure’s proximity audio is your normal navigation tool. Without it, rely on screen-shake intensity and Figure’s animation cycle.
Badge Rewards Reference
| Badge | Requirement | Difficulty |
|---|---|---|
| Modifier Initiate | 1+ modifier completion | Easy |
| Modifier Master | 3+ modifiers completion | Medium |
| Not Five Stars | 5+ modifiers completion | Hard |
| Hotel Hell | Lights Out + Soundproofed completion | Very Hard |
| Modifier Completionist | All modifier combination challenges (limited-time) | Extreme |
For entity-specific knowledge that becomes critical under modifier runs, see DOORS Entities Bestiary. For everything you’ll be spending those knobs on, see DOORS Items and Inventory Guide.
FAQ
Can I use modifiers in multiplayer? Yes. Host picks modifiers, all players share the effects. Multiplayer makes Soundproofed harder (team comms get garbled) but Lights Out easier (someone can hold a flashlight while you scout).
Do modifiers affect The Mines or other floors? As of 2026, modifiers are Hotel-only. Future updates may extend them.
Can I earn Not Five Stars with any 5 modifiers? Yes, any combination of 5+ counts. The easiest 5-stack avoids Lights Out and Soundproofed.
Are knobs from failed runs salvageable? No. A failed run pays zero regardless of multiplier. This is why the multiplier × completion rate equation matters more than raw multiplier.
Does the modifier multiplier apply to secret endings? Yes. Crucifix-ending runs under high multipliers pay the maximum knob value — the highest single-run payouts in the game.
Related Guides
- DOORS Beginner Guide — the base game you need to know before modifiers amplify your mistakes
- DOORS Entities Bestiary — every entity, their behavior, and how modifiers change them
- DOORS Items and Inventory Guide — what you’re spending those farmed knobs on
- DOORS Achievements and Secrets Guide — the badge list and the hidden content
- DOORS Speedrun Guide — when you’d rather race the clock than the multiplier