You’re Wasting Time in Every Room
Go back and watch a recording of your last DOORS run. Count how many seconds you spend in each room between entering and finding the exit. If it’s more than 2 seconds, that’s time Rush can catch you. Over a 50-floor Hotel run, shaving 3 seconds per room saves 2.5 minutes — the difference between a clean clear and a death on floor 48.
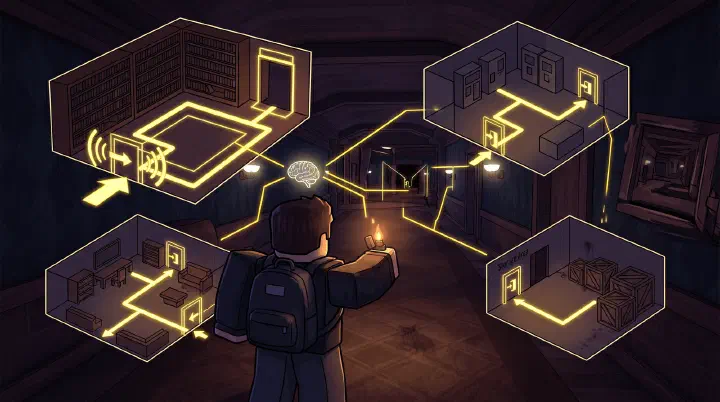
Room recognition is the most underrated skill in DOORS. Good players don’t navigate faster — they recognize faster. They’ve seen every room layout 50 times and their brain processes the exit position before their eyes finish scanning.
The 12 Hotel Room Types
Every Hotel room belongs to one of these categories. Learn the exit position for each, and you’ll navigate 90% of rooms without thinking.
Type 1: Straight Shot (Most Common — ~30% of rooms)
Layout: You enter from one end. The exit is directly opposite, on the far wall. The room is rectangular, longer than it is wide.
What you see on entry: A clear path to the exit door at the far end. Containers and furniture line the sides but don’t block the center.
Instant action: Walk straight forward. The exit is directly ahead. Check left and right for Screech as you cross, but don’t stop. This room takes 4-5 seconds to cross.
Type 2: L-Shape (~20% of rooms)
Layout: You enter from one end of the L. The exit is on the perpendicular wall at the other end. The room bends 90 degrees.
What you see on entry: A wall directly ahead with no exit. Furniture or a container on the left or right side. If there’s open space to your right, the room bends right. If left, it bends left.
Instant action: Enter, glance at both side walls. The side with more open space is the bend direction. Walk toward it. The exit is on the wall perpendicular to your entry wall. Don’t go to the far wall — the exit is on the side wall after the bend.
Type 3: Central Obstacle (~15% of rooms)
Layout: A large piece of furniture (table, bookshelf, cabinet cluster) sits in the center of the room. The exit is on the far wall, but the obstacle forces you to go left or right around it.
What you see on entry: A room with furniture blocking the straight path. You can’t see the exit because the obstacle blocks the far wall.
Instant action: Go LEFT. Not right — left. The left side of Central Obstacle rooms has wider walkways 80% of the time. The room designer consistently places the wider path on the left. Go left around the obstacle and the exit will be on the far wall.
Type 4: Corridor Bridge (~10% of rooms)
Layout: A thin room, barely 5-8 studs wide, connecting two larger areas. The exit is always at the opposite end.
What you see on entry: A narrow hallway-like room. No space to move laterally.
Instant action: Run straight through. Don’t stop. There are no hiding spots in corridor bridges — if Rush spawns while you’re in one, you need to reach the next room before it arrives. These rooms take 2-3 seconds to cross if you don’t stop.
Type 5: Closet Gallery (~8% of rooms)
Layout: A medium room with 3-6 closets lining the walls. The exit is on the far wall, typically between two closets or on the right side.
What you see on entry: Multiple closet doors on both walls. The exit is visible on the far wall.
Instant action: Mentally note the nearest closet position. Don’t stop to check them unless you need to hide. These rooms are safe zones — if Rush spawns, you’re surrounded by hiding spots. But don’t get complacent and stop to loot.
Type 6: Container Room (~7% of rooms)
Layout: A room with 3-5 loot containers (crates, lockers, shelves). The exit is typically on the left or right wall, not the far wall.
What you see on entry: Containers scattered around. No obvious exit on the far wall.
Instant action: Check the left wall first, then the right. The exit in container rooms is on a side wall 70% of the time. The room designer puts the exit on a side wall to force you to navigate around the containers instead of beelining straight.
Type 7: Dead-End Loot Room (~5% of rooms)
Layout: Small room, half the size of standard rooms. Multiple loot containers. ONE entrance. NO exit door.
What you see on entry: A small room with loot containers. No exit door on any wall. The room you entered from is the only way out.
Instant action: Grab one container if it’s on your path. Leave through the same door you entered. Don’t explore — everything in here is a gamble that costs you time. Dead-end rooms have no exits, so Rush can trap you in them with no escape.
Type 8-12: Special Rooms (remaining ~5%)
These are unique rooms — the Library (Room 50), puzzle rooms (breaker puzzles, code panels), dark rooms (no lights), flooded rooms, and boss arenas. Each has a specific layout you learn through experience.
The 3-Second Room Entry Protocol
Every time you open a door, execute this sequence:
Second 1: Exit scan. Scan the far wall, then left wall, then right wall. Your brain should process the exit position by the end of second 1. If no exit is visible on any wall, you’re in a dead end or a special room.
Second 2: Closet check. Note the nearest hiding spot. Don’t walk to it — just know where it is. If Rush screeches in the next 3 seconds, you need to already know which direction to run.
Second 3: Path plan. Your route from current position to the exit. Are you going straight (Type 1), bending (Type 2), going around an obstacle (Type 3), or walking through a corridor (Type 4)?
By the end of second 3, you should be walking toward the exit. If you’re still standing at the entrance scanning the room, you haven’t learned the types yet.