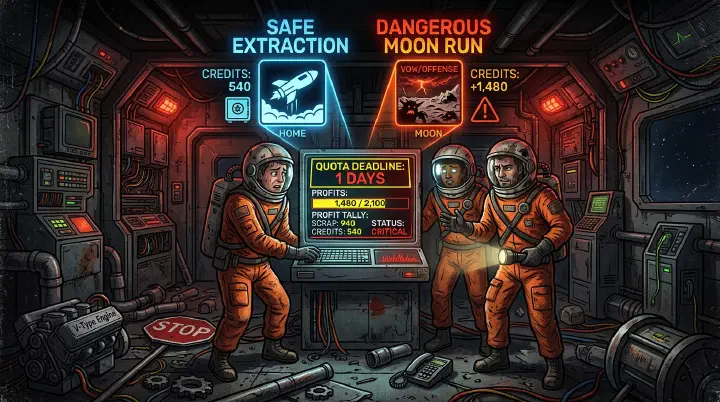
It is Day 3. Your quota reads 450 credits. The ship computer blinks green. You’ve got 380 credits in scrap sitting in the corner — a decent haul from two days of careful looting on Assurance. It’s 5 PM ship-time. Your captain opens the terminal, pulls up the moon list, and says the four worst words in Lethal Company: “Let’s do one more.”
You land on March. The weather’s foggy. Nobody checked. A Giant spawns at the main entrance before you’ve even synced your flashlights. Two teammates die instantly. You bolt back to the ship with 12 credits of scrap clutched in your hands. Total haul: 392. Quota failed. You just wiped a three-day run because you pushed for 70 extra credits instead of selling what you had and surviving.
The quota math said “one more moon” was roughly a 60% wipe-risk decision. Nobody did the math. They just saw 380 and felt the itch to get “a little more.” That itch kills more runs in Lethal Company than Brackens, Coil-Heads, and Giants combined.
Why Teams Actually Fail Quotas (Hint: It Is Not the Monsters)
Most players think quota failure happens because a Bunker Spider caught them off-guard or because the weather turned bad. That is rarely the root cause. The root cause is almost always one of four things, and three of them happen before you ever step foot on a moon.
Greed is the big one. Once a team has 80% of their quota, they get antsy. They start rounding up. “We’re basically there, let’s grab a few more big items.” That “few more” turns into a full second trip. The second trip is where the danger lives. Every extra moon you visit is another dice roll on weather, entity spawns, and team coordination. Two trips to a medium moon is not twice the risk — it is often four to five times the risk because your team is tired, low on supplies, and mentally checked out.
Not tracking scrap value in real-time is the silent killer. Teams walk around with no idea what their loot is actually worth. They find a large axle and think, “That looks heavy, must be good.” It is worth 36 credits. They walk past a gold bar worth 108 because it is small and easy to miss. If nobody on your team is keeping a running tally — mentally, on a notepad, or in voice chat — you are flying blind. You cannot make a sell-vs-push decision if you do not know where you stand.
Ignoring moon weather is pure laziness, and it is expensive. Eclipsed moons are not a flex. They are a tax on your survival rate. Foggy, rainy, and stormy conditions compound entity aggression and visibility problems. If your scrap tally is at 85% of quota and the only affordable moon is eclipsed, you do not “go for it.” You sell. Weather is not ambiance. It is a multiplier on every risk in the game.
Not understanding quota scaling is the long-term mistake that turns a single wipe into a campaign death spiral. The game does not just add a flat number each quota cycle. It scales based on how much you exceeded the previous quota. Sell 600 credits on a 450 quota? Great, you felt safe. Now your next quota is 550 instead of 480. You made the game harder because you were “good.” That is how Lethal Company punishes success. Understanding that math is the difference between a team that survives ten days and a team that wipes on day four because they inflated their own quota.
The Sell vs Push Decision Tree
You need a framework, not a feeling. Here is the decision tree that stops the “one more moon” catastrophe before it starts. Use it at the end of every day before anyone opens the terminal.
Step 1: Do a real scrap count.
Not a guess. Count it. Add it up. If you have to, throw everything on the floor and call out values. Everyone on the team should know the number.
Step 2: Compare against quota.
If your scrap value is at 100% or more of quota, you sell. No exceptions. No “but we could pad the next quota.” You sell. You live. You fight another day.
If your scrap value is at 85-99% of quota, you sell unless the moon you are currently on is free, has good weather, and you have daylight left. That is a very narrow window. If any of those three conditions fail, you sell.
If your scrap value is at 70-84% of quota, you look at the terminal. Is there a cheap, safe moon available? If yes, and your team has full health and good gear, you can consider a quick trip. But the trip must be “quick.” In and out. No deep dives. No “let’s check the basement.” If the cheapest moon is risk-rated or the weather is bad, you sell what you have and accept the partial. A partial save is better than a full wipe.
If your scrap value is below 70% of quota, you have to go out again. But you do not go out blindly. You pick the moon that gives you the best profit per unit of risk, not the most scrap. We will get to that in a second.
Step 3: Set a hard extraction trigger.
Before you land, agree on a number. “We are leaving when we hit 460 credits or when the sun hits 50%, whichever comes first.” If someone tries to extend the trigger mid-mission, the answer is no. The trigger exists because your brain will lie to you when you are three scrap items short and the hoarding bug just dropped something shiny.
Step 4: Sell immediately upon return.
Do not organize the ship. Do not check the store. Do not “see what the next quota looks like.” Open the terminal, hit sell, confirm, and breathe. The credits are safe only when they are in the company bank. Every second they sit as physical scrap is a second they can be lost to a surprise teleport or a fire exit mishap.
Scrap Thresholds Per Quota Tier
You do not need a spreadsheet. You need a rough sense of where the danger zones are. Here is a quick-reference table for how much scrap you need to feel safe at each tier, and when to stop pushing.
| Quota Tier | Target Scrap Before Sell | Hard Stop (Sell No Matter What) | Risk Moon Tolerance |
|---|---|---|---|
| Day 1-2 (130-220) | 110% of quota | 100% of quota | None — avoid risk moons entirely |
| Day 3-5 (350-550) | 105% of quota | 95% of quota | Low — only if weather is perfect and team is fresh |
| Day 6-8 (600-900) | 100% of quota | 90% of quota | Moderate — cheap risk moons acceptable with good gear |
| Day 9+ (1000+) | 100% of quota | 85% of quota | Higher — you will need risk moons, but never eclipsed unless desperate |
Notice something important: as quotas get bigger, the “hard stop” actually drops slightly. That is not because later days are safer. They are not. It is because on a 1000-credit quota, being at 850 and selling means you are only 150 short. You can make that up on one good moon. On a 200-credit quota, being at 170 and selling means you need 30 more, which sounds easy but the proportional risk is the same — you still need another trip. The difference is that on day 2, you do not have the gear or the experience margin to survive that extra trip. On day 9, you might, but you are also walking into harder moons with more aggressive entities.
The Counter-Intuitive Truth: Meeting the Quota Exactly Is Better Than Beating It
This is the part that breaks brains. Most teams celebrate when they overshoot a quota by 200 credits. They should not. They should be mildly annoyed.
Remember the scaling. The game looks at how much you sold versus what was required. If your quota was 450 and you sold 620, the game says, “Cool, you are good at this. Next quota is 580.” If you had sold exactly 460, the next quota might have been 480. You turned a manageable next day into a harder one by being greedy today.
That does not mean you should intentionally throw away scrap. It means your goal should be “hit quota, stop.” If you are at 455 on a 450 quota and there is still loot on the ship, you do not rush out for more. You sell. You take the small win. You keep the next quota low. Over a ten-day campaign, the teams that consistently hit quota by 5-15% go further than the teams that spike 30-40% over and then wonder why day 8 feels impossible.
The most profitable run is not the one with the highest single-day haul. It is the one with the lowest death count and the shallowest quota curve. Slow and steady genuinely wins this race.
The Most Profitable Moon Is Not the One with the Most Scrap
Another trap: looking at the moon list and picking the one with the highest potential scrap value. Titan has huge scrap numbers. Everyone knows it. Everyone also knows it eats teams alive. The scrap you actually keep is what matters, not the scrap that exists on the moon.
Profit-per-moon is a function of three things: average scrap value, average survival rate, and time cost. A moon that gives you 200 credits of scrap but kills you 40% of the time is mathematically worse than a moon that gives you 120 credits and kills you 5% of the time. Here is the math nobody does:
If you run Titan four times, you might pull 800 credits total. But if you die two of those four times, your expected value per trip is 200 credits, and you are resetting your progress on every other run. If you run Assurance eight times, you might pull 960 credits total with one death. Your expected value per trip is 137 credits, and you are not wiping your save.
Titan is not a farm. It is a casino. The house always wins eventually. If you are behind on quota and desperate, sure, roll the dice. But if you are managing quota properly, you should never be desperate enough to need Titan on a regular basis. Treat high-risk moons as emergency medicine, not a daily vitamin.
For consistent quota management, your workhorse moons are the mid-tier ones: Assurance, Vow, and March. They have enough scrap to hit early quotas reliably, low enough risk that you can extract with partial hauls safely, and cheap enough routes that you can afford a “test trip” to see how the team is playing that day. If the first trip to Assurance goes smoothly and you are ahead of schedule, great. If it goes poorly and you are at 60% quota with two days left, you now know you need to play tighter, not looser.
Quota Scaling: The Math That Hides in Plain Sight
The quota scaling formula is not published by the developers, but the community has reverse-engineed it well enough to plan around. After you sell, the next quota is calculated as:
Next Quota = Previous Quota + Base Increase + (Overshoot Multiplier * Excess Credits)
The base increase is roughly 100-150 credits depending on the day. The overshoot multiplier is what kills you. It is estimated to be around 0.4 to 0.6, meaning if you overshoot by 200 credits, your next quota jumps by an extra 80-120 credits on top of the base increase.
This is why padding is dangerous. A 200-credit overshoot does not just feel good. It literally makes the next quota 80-120 credits harder. Over three days of “good hauls,” you have inflated your quota by 300-400 credits that you did not need to face. The game rewards restraint more than it rewards bravery.
If you want to game the system — and you should — aim for the minimum viable sell. Hit quota, sell immediately, and let the next quota grow as slowly as possible. The only time you should intentionally overshoot is if you are on a moon with scrap you cannot avoid picking up, or if you are at the end of a day and carrying it back would waste a trip anyway. Even then, do not go hunting for extra. Take what is on your path and leave.
The Daylight Clock Is Not a Suggestion
One more piece of the puzzle that teams ignore: time of day. Entity aggression and spawn rates increase as the day progresses. A moon that felt safe at 10 AM is not safe at 4 PM. If you are pushing for a second trip on the same day, you are not just adding moon risk. You are adding time-of-day risk.
The math here is simple. If you land at 8 AM and have a clean 4-hour window, you can afford to be methodical. If you land at 2 PM, you have maybe 2 hours of relative safety before things get hairy. That is not a lot of time to scout, loot, and extract — especially if you hit a snag like a locked door or a Bracken camping the main route.
When you are in the sell-vs-push decision tree, factor in the clock. If you are at 80% quota and it is already 3 PM, you sell. The scrap you have is worth more than the scrap you might find in the next 90 minutes of compressed danger. Time is a resource in Lethal Company, and spending it on the margin is how you go from “almost there” to “wipe screen.”
TL;DR: The Rules That Actually Matter
Here is the cheat sheet you can read aloud in the ship before anyone touches the terminal.
Count your scrap honestly. If you do not know the number, you cannot make the decision.
At 100% quota, sell. No exceptions.
At 85-99%, sell unless the moon is free, safe, and you have daylight. That is rare.
At 70-84%, consider one quick trip on a cheap moon. Set a hard extraction number before you land.
Below 70%, you have to go out, but pick the safest moon that gets you there. Do not chase Titan.
Never sell above quota intentionally. Overshooting makes the next quota harder. The game punishes success.
Check the weather. Eclipsed is not a flex. It is a tax.
Watch the clock. Late-day trips are not the same as morning trips. Extract earlier than you think you need to.
If you follow these rules, you will stop wiping on “almost there.” You will stop watching the quota screen turn red because someone wanted 70 more credits. You will start hitting quota consistently, and you will realize the real horror in Lethal Company is not the monsters. It is the temptation to push your luck just a little bit further. Do not push. Sell. Survive. The math is on your side only if you use it.