4:58 PM on Assurance. Everyone Dies.
Picture this run. Day 3, quota is 800 credits. Assurance, free landing, low risk. You and three friends drop at 8 AM with stamina bars full and a plan that doesn’t really exist.
You split into pairs. One pair pushes left through the maze of corridors. The other goes right. Comms are good. You’re laughing. Someone finds a Cash Register — 60 credits, heavy, awkward. They pick it up anyway. Someone else finds a Magnifying Glass — 35 credits. They grab a Toilet Paper too. Six credits. Why not.
It’s 11 AM in-game. Ship has maybe 90 credits of scrap on it. Nobody has gone back yet.
You hit a Bunker Spider room. Lose 20 minutes flanking around it. By 1 PM you find the apparatus. 80 credits. Great. But now there’s a Coilhead in the hallway and you take the long way out. By 2 PM your inventory has a Stop Sign, a Yield Sign, and one Toy Robot. Around 140 credits of scrap on your back. You decide to “do one more room.”
It’s 3:30 PM when you start the walk back. The fire exit you came in through is now on the wrong side of the map. You hit a Bracken on the way. Lose one. The other three sprint with 70% stamina. The sun is orange. Eyeless Dogs spawn at 5 PM.
At 4:58 PM, three of you are dead in a field 40 meters from the ship. The ship leaves at 5 with 210 credits of scrap. Quota was 800. You get fired tomorrow.
The problem wasn’t the Bracken. It wasn’t the Coilhead. It wasn’t even the Eyeless Dogs.
The problem was your route. You didn’t have one.
Why Checking Every Room Fails
The default impulse in Lethal Company is to clear the facility like a Diablo dungeon. Open every door, check every shelf, miss nothing. This is wrong, and the math is brutal.
A facility on Assurance has roughly 40–60 rooms. Maybe 25 of them contain scrap. Of those, maybe 10 contain scrap worth more than 30 credits. The other 15 contain stuff like Toilet Paper, Boxes of Rubber Ducks, and Whoopie Cushions — items that take an inventory slot and pay you less than the time cost of carrying them back.
Three forces are eating your run, and none of them are the monsters.
Time decay. The map only gets more dangerous. Eyeless Dogs spawn at 5 PM on most outdoor moons. Inside the facility, Nutcrackers and Jesters become more aggressive as the day progresses. Every minute you spend at 3 PM is twice as expensive as a minute at 10 AM, because the death risk on the return trip is climbing exponentially.
Value density. Your inventory is 4 slots. Period. A 6-credit Toilet Paper and a 90-credit Painting both take 1 slot. If you pick up the Toilet Paper because “it’s right there,” you’ve just committed 25% of your carrying capacity to less than 1% of your quota. Value per slot is the only metric that matters on the trip out.
Return-trip risk. Every meter from the ship is a meter you walk back, twice as slow because you’re carrying scrap and your stamina caps out around 50% with a full pack. The deepest room in the facility is not “one more room.” It’s a 90-second sprint home through corridors that didn’t have Coilheads in them three hours ago but do now.
This is why teams who clear systematically come home broke and dead. The optimal strategy isn’t coverage. It’s selection.
The 2-Slot Rule
Here’s the single rule that fixes 80% of bad runs.
Reserve your top 2 inventory slots for scrap worth 50+ credits. Fill the bottom 2 with anything 30+. Never carry anything under 25.
Quick math. If everyone in a 4-person team follows this, a full ship-load is 16 items at an average of, say, 50 credits each. That’s 800 credits in one trip. Quota done.
If your team picks up everything that isn’t bolted down, you average 20 credits per slot. Same 16 items, 320 credits. You need three trips. You don’t have time for three trips.
The items that pass the bar on most moons are:
- Apparatus (~80 credits, always grab, always)
- Cash Register (~60 credits, heavy but worth it)
- Painting (~60–100 credits, two-handed, send the strongest player)
- Bottles (~45 credits, fragile but light)
- Magnifying Glass / Pearl / Brass Bell (~30–55 credits, instant grabs)
- Stop Sign / Yield Sign (~25–40 credits, weapon utility doubles their value)
Items to walk past unless you’re already at the ship:
- Toilet Paper, Whoopie Cushion, Rubber Ducks (under 15 credits)
- Toothpaste, Tea Kettle, single Toys (10–25 credits, slot-inefficient)
- Anything you have to backtrack for
This isn’t elitism. It’s the only way the inventory math works. For a fuller breakdown of which items pay rent, the Scrap and Loot Guide lists the full value table.
Moon-Specific Routes
Each moon has a different shape, and the optimal route reflects that. “Just go in and look around” is not a strategy. Here’s what actually works on the moons you’ll spend the most days on.
Experimentation (free, easy). The facility entrance is close to the ship. Apparatus is almost always present and worth the trip alone. Optimal route: send 2 players for apparatus on a fast push, 2 players surface-loop the outside fire exits for any external scrap. Total run time: 60–90 in-game minutes. Repeat trip if quota still open. You can do 2 full trips here in a day if you’re disciplined.
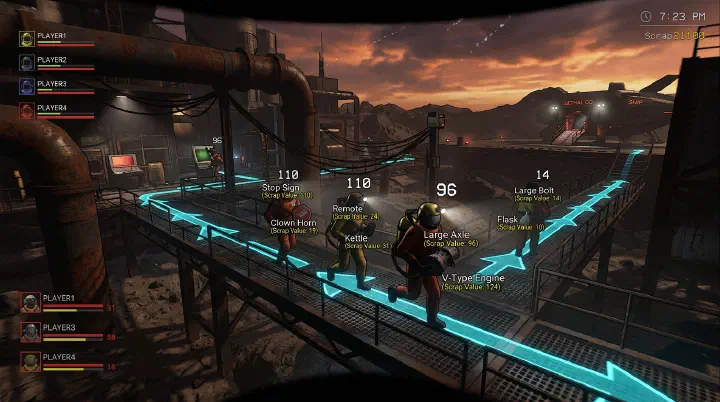
Assurance (free, medium). Twice the maze, twice the spawn budget. The facility has more high-value scrap but also more dead-end corridors. Optimal route: rope-team of 3 pushes one direction deep, picks up everything 30+ on the way in, drops one slot’s worth of low-value scrap if a better item appears. Fourth player stays near the entrance as a scout and shuttle runner. Out by 2 PM, back at ship by 3 PM, second short trip 3 PM to 4:30 PM through the fire exit only.
Vow (free, low risk outdoor). The trick on Vow is the outdoors. The facility is far from the ship. Outdoor scrap on Vow is unusually good — Stop Signs and Yield Signs spawn near the cliffs, and the river path has Bottles. Optimal route: one pair surface-loops the outdoor scrap (20-minute circuit, 100+ credits), one pair pushes facility. The outdoor pair makes 2 trips. The indoor pair makes 1 long one.
Offense (paid, dangerous). Higher value scrap but Nutcrackers spawn early and Coilheads patrol main corridors. Optimal route: zigzag — go deep on a single corridor, grab the highest-value items, retreat. Do not loop the facility. The expected value of “one more room” on Offense is negative after 1 PM.
March (paid, large outdoor). Massive surface map. Apparatus is deep, but the outdoor scrap density is the highest in the game. Optimal route: 3 players surface-loop with Shovels (for self-defense against outdoor enemies), 1 player solo-pushes apparatus. The surface team can clear 300+ credits without ever entering the facility.
Titan / Rend / Dine (paid, brutal). These are not “loot every room” moons. They are “grab the 3 highest-value items you can find and leave” moons. Drop, push one direction, pick up the first 4 items of 50+ credits, and walk out. Anything more than 90 minutes inside Titan is a coinflip with your life.
For moon costs, weather modifiers, and quota scaling per moon, the Moon Guide covers the economics in detail.
The Time-Budgeting Framework
Routes are useless without a clock. Here’s the time budget that prevents the 4:58 PM disaster.
8 AM – 11 AM: Push phase. Move fast, grab high-value targets, no backtracking. Full inventory by 11 AM is the goal. If you’re not full at 11, you’re either too deep or too picky.
11 AM – 1 PM: First return. Walk back to the ship, drop everything, eat (if you have a candy), get the Walkie reset. This isn’t optional. The first trip pays the day’s quota; the second trip is gravy. Teams that “just keep going” until 2 PM almost always die on the return.
1 PM – 3 PM: Second push. Shorter, more cautious. Stick to areas you mapped on the first run. Avoid any room you saw a Coilhead in. Inventory full by 3 PM.
3 PM – 4:30 PM: Second return and consolidation. Stragglers come home. Anyone still in the facility at 4 PM rolls a die. At 4:30 PM, everyone is at the ship. Period.
4:30 PM – 5 PM: Buffer. This is when somebody inevitably says “there’s a Soccer Ball right here, let me grab it.” This is when somebody dies. The buffer is for the unexpected — a Bracken that chased you, a door that closed, a teammate carrying a 2-handed item slowly. Do not spend the buffer on more scrap.
The whole framework can be summed up as: two trips, hard cutoff at 4:30 PM, never split off solo after 3 PM.
A team that runs this clock hits 800-credit quota on Day 2 of the cycle, every cycle. A team that improvises hits it maybe 1 in 3 cycles.
The Counter-Intuitive Advice
Most guides tell you to clear the facility methodically and prioritize finding the apparatus. Both pieces of advice are wrong as defaults.
The apparatus is not always worth pulling. It’s 80 credits and 2 inventory slots once you yank it. If you’re alone, you’ve just committed half your carry to a single item that requires sprinting to the entrance with no spare slots for opportunistic grabs on the way out. On easy moons (Experimentation), yes — pull it. On harder moons (Titan, Dine), the apparatus is in a dangerous central room and the 80 credits is often not worth the 4–6 minute death-roll to get it out. A Cash Register and a Painting near the entrance can be the same value with half the risk.
Going back to the ship empty-handed is sometimes optimal. If you have nothing 30+ in your inventory and it’s 11:30 AM, the correct play is to drop your low-value scrap and run back for a clean second push. People hate doing this because it feels like failure. It’s not. It’s the same logic as a poker player folding a bad hand — minimizing loss is winning. The data is brutal: a team that resets at 11:30 AM with empty inventories beats a team that “commits to what they have” almost every time.
The deeper point: scrap collection in Lethal Company isn’t a horror game mechanic. It’s a logistics problem with horror game consequences. Treat it like one and you stop dying.
Coordinating the Route With the Team
A route plan only works if the team executes it. Two coordination pieces matter more than the route itself.
Role assignment before drop. Decide who pushes deep, who shuttles, who watches the entrance. The co-op team roles guide has the full breakdown, but the minimum is: one person is the “ship runner” whose only job is shuttling scrap to the ship and watching the door. They don’t push deep. They don’t get greedy. They are the team’s anchor.
Terminal usage. The terminal player is not just for opening doors. They call out enemy positions, ping the map, and track time. A team without an active terminal user is running 30% slower than one with. See the terminal commands guide for the specific commands that matter for route execution — particularly view monitor and radar player.
Gear loadout. Pro-Flashlights, Shovels, and a Jetpack on at least one player change the route math entirely. A Jetpack lets you traverse outdoor moons in a third of the time. The equipment guide has the priority list — but the short version is: Pro-Flashlights pay for themselves in one day, and at least one Shovel per team is mandatory after Day 3.
What This Looks Like When It Works
A team running the framework on Assurance, Day 3, quota 800.
8 AM: Drop. Two-pair split. Push pair goes left through the main corridor. Shuttle pair takes the right entrance and stays near it.
10:30 AM: Push pair has Apparatus, Cash Register, two Bottles. ~250 credits, full inventory. Heading back.
11:15 AM: Push pair drops at ship. Shuttle pair has Magnifying Glass, Stop Sign, Yield Sign, Brass Bell from the right entrance — ~140 credits. They walk out and reset too.
11:30 AM: Team at ship. 390 credits dropped. Quota still needs 410.
12 PM: Second push. Both pairs go in via the right entrance (the corridor they mapped). Avoid the left corridor where the Coilhead was.
2:30 PM: Everyone back. Picked up two Paintings, a Toy Robot, three more Bottles, and a Pearl. ~450 credits.
2:45 PM: Ship total is 840 credits. Quota hit. Team votes to lift.
3 PM: Ship leaves. Nobody died. Nobody got chased home in the dark.
This isn’t a fantasy run. It’s what happens when you treat the route as the actual mechanic of the game. If you’re still learning the basics of moon selection and survival, the Beginner Guide covers the foundations — but once you’re past Day 5 cycles, route optimization is the only thing standing between you and the firing.
Stop checking every room. Pick the right rooms. Get out before sunset.