90 Seconds in the Tower
You spent two weeks breeding. Five Jetragons. Each one rolled Legend, Musclehead, Ferocious, and Burly Body. Level 50. Condensed to four stars. Saddle equipped. You watched the IV calculator hit green on every stat.
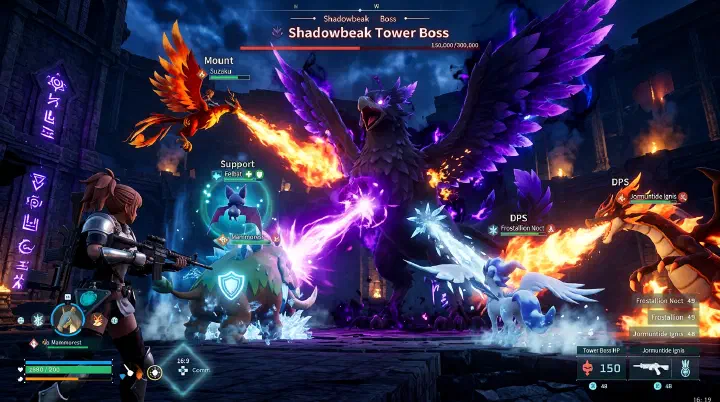
You fast-travel to the Wildlife Sanctuary Tower. Victor & Shadowbeak loads in. You toss the first Jetragon. It opens with Dragon Cannon — big yellow numbers, 8,000 damage. Then Shadowbeak swings.
Shadow Burst. 4,200 damage. Your Jetragon, the one with 9,800 HP, drops to 5,600. Another swing. Dead.
You throw the second. Same thing. Third. Fourth. Fifth. Ninety seconds in, your whole party is on cooldown, and you’re pulling an assault rifle on a level 50 boss while strafing in circles. You die. You respawn. You check the wiki.
Dark attacks. Shadowbeak hits with Dark. Dragon types take 150% damage from Dark.
You didn’t lose because your Pals were weak. You lost because all five had the same weakness, no tank ate the hits, no support buffed your damage, and no flex Pal covered the gap when things went sideways. You brought five copies of the same hammer to a fight that needed a toolbox.
This is the trap of mono-teams. Let’s fix it.
Why Mono-Teams Are a Trap
The Palworld community will tell you “just breed Jetragons.” Forums, YouTube, Reddit — same advice. Jetragon is S-tier, so five Jetragons should be S-tier squared, right?
No. Here’s why.
Element weakness stacks. Every Pal has one element. Every element has a counter. If your whole team is Dragon, then every Dark-type boss erases you. If your whole team is Fire, then Lifmunk Effigies and Water bosses laugh. You’re not fielding five Pals — you’re fielding one Pal in five bodies.
No role diversity. A Jetragon is a glass cannon mount. It deals 100% of its value as ranged DPS while flying. It can’t tank. It can’t heal. It can’t buff. When it gets staggered out of the air, it’s useless on the ground. Five glass cannons means five glass.
No sustain. Boss fights in Palworld aren’t 30-second burns. Tower bosses have 200,000+ HP. Raids stretch past five minutes. You need a Pal that can absorb a hit cycle while your DPS resets cooldowns. Jetragons cannot absorb anything.
Cooldown overlap. All five Jetragons share the same skill cooldowns conceptually — same animation startup, same recovery frames, same skill priority. You can’t rotate them like a fighting game roster. They all want to do the same thing at the same time, and only one can be active.
If you’ve read our best Pals tier list, you’ll notice the S-tier list isn’t five Jetragons. It’s a Tank, a Mount, a DPS, a Support, and a wildcard. That’s the framework.
The 5-Role Team Framework
Forget tier lists for a second. Build by role first, then pick the best Pal for each role.
Role 1 — The Tank
The tank takes hits so your DPS doesn’t.
- Job: Aggro the boss, eat one or two attack cycles, then swap out.
- Stats that matter: HP, Defense, not Attack.
- Passive priority: Burly Body, Stronghold Strategist, Ferocious (NOT Legend — you don’t need crit).
- Top picks: Anubis (Ground, 4,500 HP, high defense), Astegon (Dragon/Dark, 5,900 HP), Blazamut (Fire, 6,800 HP, but mind the weakness).
Tank Pals are the most ignored role in the game. Players skip them because tier lists rank by DPS. Wrong move.
Role 2 — The DPS
The damage dealer. The one with Legend, Musclehead, Ferocious, Lucky.
- Job: Output as much damage as possible in a 15-second burst window after the tank pulls aggro.
- Stats that matter: Attack, crit chance via Legend.
- Top picks: Jetragon (ranged, mounted), Frostallion (ranged, AoE), Necromus (melee, fast).
Note: your DPS is a specialist. Don’t make them tank. Don’t make them mount you across the map. They have one job.
Role 3 — The Mount
The travel Pal. Maybe also a flying DPS, but primarily transportation.
- Job: Get you to the fight, scout terrain, reposition mid-combat.
- Stats that matter: Movement speed, stamina, glide range.
- Top picks: Ragnahawk (fast flyer, decent fire damage), Beakon (lightning, fast), Direhowl (ground sprinter, early game).
A mount Pal that doubles as DPS is great. A mount Pal that ONLY mounts is also fine. What you can’t have is no mount, because then you waste 40% of fight prep walking.
Role 4 — The Support
The buffer, healer, or status applier. The most underrated slot in Palworld.
- Job: Multiply your DPS output, heal your tank, or apply status.
- Stats that matter: Skill cooldown, Workspeed (for some support effects), passive utility.
- Top picks: Pyrin Noct (fire buff aura), Mossanda Lux (electric debuff), Lyleen (healing flowers).
This is the role that triples your damage output. A Pyrin Noct in your party adds a fire damage aura that affects ALL your fire-type ranged attacks. Pair it with a Blazamut and your effective DPS goes from 1x to 3x.
Role 5 — The Flex
The wildcard. Filled based on the specific boss.
- Job: Cover whatever the boss exploits. Element counter, mobility, dispel, whatever.
- Stats that matter: Situational.
- Top picks: Depends on Tower. See matrix below.
The flex slot is what separates players who clear Towers on attempt 2 from players who clear on attempt 20. You don’t run a fixed 5-Pal team. You run a fixed 4-Pal team and swap the flex.
The Element Coverage Matrix
Here’s the Tower-by-Tower flex slot recommendation. Use it.
- Zoe & Grizzbolt (Electric) → Bring a Ground type. Anubis, Digtoise, or Penking.
- Lily & Lyleen (Grass) → Bring a Fire type. Blazamut, Suzaku, or Wixen.
- Axel & Orserk (Dragon/Electric) → Bring a Dragon AND a Ground. Astegon doubles up nicely.
- Marcus & Faleris (Fire) → Bring a Water type. Jormuntide or Relaxaurus Lux.
- Victor & Shadowbeak (Dark) → Bring a Dragon type. NOT five Dragons. ONE Dragon as flex, plus your usual team.
- Saya & Selyne (Neutral/Dark, new content) → Bring a Dragon as flex, but prioritize crowd control.
The mistake players make: they build their entire team around the boss’s weakness. That fails because you lose general utility. The right move: keep your 4-Pal core, swap the flex.
For the full boss roster and HP values, see our boss and Tower guide — the move sets there will tell you which exact attacks you need to dodge versus absorb.
Counter-Intuitive Advice: Your Best DPS Is Probably Not Mounted
Every Palworld guide tells you to ride Jetragon for the Tower fight. Air mobility, ranged missiles, never gets hit by melee.
This is wrong for half the Towers.
When you’re mounted, YOU are the damage dealer, not the Pal. The Pal’s skills go on a longer cooldown. You’re firing the assault rifle, the rocket launcher, the legendary bow — your weapon does the damage. The Pal’s role becomes “moving gun platform.”
That’s fine if your gun is better than your Pal’s skills. For Tower bosses with 200K+ HP, your Pal’s skills are usually better than your gun. So dismount, throw the Pal, let it use its full skill rotation, and you snipe with a legendary bow from cover.
The numbers:
- Mounted Jetragon firing rockets: ~6,000 damage per 4-second cycle = 1,500 DPS.
- Dismounted Jetragon using Dragon Cannon + Beam Comet + auto-attacks: ~12,000 damage per 8-second cycle = 1,500 DPS, but with you ALSO shooting from cover with a legendary assault rifle (~800 DPS solo). Total ~2,300 DPS.
Dismount when the Pal’s skills out-damage your gun. Stay mounted when YOU’RE the bigger weapon. It depends on your gear tier, not the Pal tier.
Support Pal Combos That Triple Your DPS
This is the section nobody writes about because it’s not flashy. But it’s the actual answer to “why doesn’t my team kill bosses faster.”
Pyrin Noct + Fire DPS: Pyrin Noct’s partner skill gives you a fire damage buff. Pair with a Blazamut or Faleris and your fire attacks gain ~40% damage. Free.
Mossanda Lux + Electric debuff: Drops the boss’s defense if you can apply the status. Stacks with your DPS.
Lyleen + Tank rotation: Lyleen’s healing flowers refill your tank Pal between attack cycles. Lets your Anubis stay alive through three full boss rotations instead of one.
Helzephyr + sleep status: Niche, but on bosses that don’t resist status, sleeping the boss for 3 seconds gives your DPS a free burst window.
The combo logic: don’t think “what’s the strongest Pal.” Think “what makes my other Pals stronger.”
Base Setup for Tower Prep
Your team comp depends on what you can breed and condense. That requires a real base.
- A breeding farm running 24/7 with two parent Pals on rotation.
- A condenser line for the 4-star upgrade on your DPS Pal.
- A medical bed station to refill HP between Tower attempts.
- Enough Pal Souls (small, medium, large, giant) stockpiled for at least three 4-star condenses.
If your base is just a hut and a campfire, your team will plateau no matter what Pals you collect. See our base building guide for the breeding-optimized layout — the breeding farm placement next to the ranch is the difference between 1 egg per hour and 4.
Breeding the Right Passives for Each Role
A tank Pal with Legend, Musclehead, Ferocious, Lucky is a waste. Those are DPS passives.
Tank passives:
- Burly Body (+20% defense)
- Stronghold Strategist (defense aura)
- Ferocious or Musclehead (yes, attack helps with aggro)
- Vanguard (+10% attack on first hit — helps draw aggro)
DPS passives:
- Legend (+20% attack, +20% defense, +15% move speed)
- Musclehead (+30% attack, -50% attack speed — usable for slow heavy hitters)
- Ferocious (+20% attack)
- Lucky (+15% work speed, +15% attack)
Support passives:
- Serenity (faster cooldown)
- Workaholic (for base supports)
- Conceited (+20% work speed)
- Whatever’s relevant to their aura
If you’ve been mass-breeding Jetragons with Legend stacks, switch one breeding line over to a tank Pal with defensive passives. The full passive inheritance rules are in our breeding guide — note especially the 4-passive parent rule that maxes inheritance odds.
A Real 5-Pal Team That Clears Every Tower
Here’s a concrete build, level 50 endgame, that handles all five Towers with flex swaps:
- Tank: Anubis. Burly Body, Stronghold Strategist, Vanguard, Ferocious.
- DPS: Jetragon. Legend, Musclehead, Ferocious, Lucky.
- Mount: Ragnahawk (or Jetragon doubles up — leave one mount-only Pal at base).
- Support: Pyrin Noct. Serenity, Conceited, Lucky, Workaholic.
- Flex: Swapped per Tower. Frostallion for Marcus, Astegon for Victor, Penking for Zoe, etc.
Total breeding investment: ~40 hours of active play, ~80 eggs hatched, ~12 condenses. That’s not cheap. But it’s a team that clears, not a team that gets wiped.
If you’re earlier in the game and don’t have access to legendaries yet, the beginner guide walks through the level 1-30 team progression — the tank/DPS/support split applies there too, just with weaker Pals.
What to Do Next
Stop breeding the sixth Jetragon. Roll back into your base.
- Pick a tank Pal you don’t have. Anubis is easiest to get.
- Set up a breeding pair targeting Burly Body + Stronghold Strategist.
- Pick a support Pal. Pyrin Noct if you run fire, Mossanda Lux if you run electric.
- Test the new comp on the easiest Tower first (Zoe & Grizzbolt).
- Adjust the flex slot per Tower.
You’ll clear the same boss that wiped your five Jetragons in under three minutes. Not because you got stronger. Because you got smarter.
Raw stats lose. Composition wins. The Pal Pals that get featured on tier lists are individuals. The teams that clear Towers are systems.
Now go breed a tank.