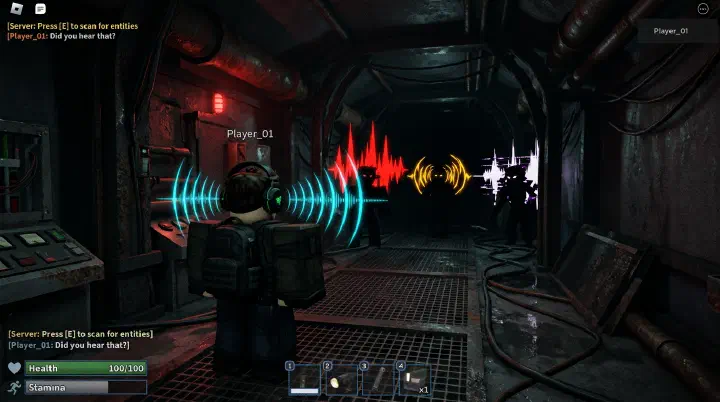
Door 68. The Music Was On. You Never Heard It.
It’s 11:47 PM. You’re on a Heavy run. The hallway past Door 68 is a long stretch where pipes drip and lights hum and you can hear your own breathing through the headset. The soundtrack is doing its job — a slow, tense build.
Then the ambience cuts. You don’t notice. You can’t. The music is swelling right over the frequency band where the warning lives. The room went silent for a full second and a half — pipes, water, the low mechanical breath of the Blacksite, all gone — and the score papered over it. Then the hum started, a rising electronic static building from the far end of the hall. Also buried.
You walked into the next room and the Angler took your head off.
The kill screen says ANGLER. And you’re sitting there thinking it came out of nowhere, when the game told you twice. You were just deaf to it.
That’s the most common Pressure death past Door 50. Not slow reflexes. Not a missed locker. Audio. You died with your ears full of music when you should have been listening for silence.
Why Audio Beats Sight in Pressure
Pressure is an audio game wearing a horror game’s skin. Sight is your backup sense. By the time you see an Angler round the corner, you have half a second — often less. The sound arrives two to four seconds before the body, and that gap is your whole response window.
You never get hit by something you saw coming. You get hit by something you should have heard. The locker is the response, but the sound is the trigger — and the locker mechanics don’t matter if you never reach the door.
That’s why every lethal entity announces itself through audio before anything shows on screen, and why those same entities are nearly impossible to fight on laptop speakers or a muted phone. The sound is the mechanic. Miss the ambience drop and the enemy materializes in your face with no warning.
The good news: the audio is consistent. The same sound means the same thing every run. Learn it once and it carries you to Door 100. The beginner guide covers movement and lockers, but the sound layer is what separates a clear from a corpse.
The Master Rule: When the Ambience Stops, Hide
Before you learn a single entity sound, learn this: the ambience stopping is the universal warning.
Every room has a background drone — pipes hissing, water dripping, a low mechanical hum under everything. It’s not decoration. It’s a heartbeat, and when it stops, something is coming.
The sequence is almost always the same. The room goes quiet for a beat. Then the entity’s signature sound arrives. Then the entity. The silence comes first — and that’s the part you can act on before you know what you’re dealing with.
This is the answer for players who can’t tell an Angler from a Blitz yet. You don’t have to. The silence drop is identical for the whole Angler family. Room goes quiet, you get near a locker. Ambience fades back in, the threat has passed. That one rule handles most run-ending entities in the game, and it requires zero memorization.
The flip side is just as important. The ambience returning is the all-clear. Most players learn the attack sound and never learn the release. They sit in the locker five extra seconds, or bolt early into a second pass. When the drone comes back, the entity is gone. Learn that release as carefully as the attack — it’s what lets you move again without dying for it. For the exact frame-by-frame windows, see the entity timing windows guide.
Entity-by-Entity Audio Profiles
Here’s what each main threat sounds like. Lock the Angler family into your ears first — they share a shape, but each has a flavor.
Angler
The baseline threat, and the one you’ll hear most. Its approach is a rising electronic hum or static that builds as it closes in. It starts faint, two or three rooms back, and peaks right before the body arrives. The ambience cuts first, then the hum. When the hum is loud and climbing, it’s on top of you. Locker, shut the door, don’t breathe.
The after-hum kills beginners. The sound lingers in the pipes a few seconds after the Angler passes. It’s an echo, not a second attack. Rule: if the hum is fading, you’re safe. If it’s getting louder, you’re not.
Blitz
Same family, cranked up. Blitz is faster, higher-pitched, and gives almost no runway — the warning ends before your brain finishes filing it. Don’t try to reach a comfortable locker. Take the nearest one, instantly. Blitz punishes decision-making, so don’t decide.
Froger
Froger trades the hum for a rhythmic, wet croak — louder than any ambient drip, like something big moving through water. The signature that catches everyone: Froger rebounds. It passes once, then comes back through the same corridor. Players who leave after the first pass eat the second. Stay in the locker until the ambience fully returns.
Pandemonium
The nastiest audio in the game. A layered, multi-voice scream that feels omnidirectional — you can’t locate it because it’s coming from everywhere, with screenshake on top. And unlike the rest of the family, Pandemonium doesn’t just pass. It tests lockers, faking you out and breaking doors. Hold the locker, keep your head down, and don’t exit early no matter how close the screaming gets. The entity timing guide covers how long to hold.
Chainsmoker
The easiest to identify, because it wears its name in the sound. A chain rattle and a wheezing rasp follow it down the corridor, audible well before the body arrives. Chainsmoker moves slower but has a long-range grab, so distance isn’t safety. The rattle gives you extra warning — use it to get into a locker cleanly, and stay clear of any door it’s passing.
| Entity | Signature sound | First cue | Response |
|---|---|---|---|
| Angler | Rising electronic hum/static | Ambience cuts | Locker, shut door |
| Blitz | Short high scream, sudden | Barely a warning | Nearest locker, instantly |
| Froger | Rhythmic croak | Ambience cuts | Locker, wait for two passes |
| Pandemonium | Layered omnidirectional scream | Screenshake + scream | Locker, hold, don’t exit early |
| Chainsmoker | Chain rattle + wheeze | Rattle from down the hall | Locker, keep distance from doors |
The Rest: What Sound Doesn’t Cover
Not everything announces itself. The entities guide runs the full roster; here’s the audio reality for the silent threats:
- Pinkie — effectively silent in practice. No roar, no ambience cut, no music sting. If it makes a sound, it’s too faint to rely on. Pinkie is a visual encounter: turn around on long corridors, and if you see pink, sprint — don’t hide. Lockers don’t save you from Pinkie.
- Wall Dwellers — no audio at all. Their tell is a darker crack in the wall with faint movement inside. Walk past on the opposite wall.
- Eyefestation — a wall of eyes that kills you for looking at it. No directional sound, just screen distortion when you’re close. Look at the floor and walk.
- Searchlights — the light is the threat. The ambient hum around it isn’t directional, so watch the beams, not your ears.
- Turrets — a charge-up whine builds right before they fire. Break line of sight the instant you hear it.
Sound isn’t the whole game. It’s the first layer. Some entities beat your ears, and those are beaten by eyes and movement instead.
How to Practice Audio Identification
You learn this by dying, so die on purpose.
First, fix the setup. Wired stereo headphones — no Bluetooth, because latency desyncs audio from visuals and scrambles direction. SFX volume at 80 to 100 percent. Music low or off; the score sits in the same frequency range as the Angler’s hum and buries it exactly when you need it most.
Then run it back with intent:
- Five solo runs, music off. Absorb the ambient soundscape. You need a baseline of “normal” before “abnormal” means anything.
- Two runs failing on purpose. Let the Angler kill you so you hear the full curve: silence, hum, death. Lock in the build.
- One Froger run. Wait through both passes so the rebound stops surprising you.
- One silent-threat run. Don’t hide for anything. Learn what Pinkie and Wall Dwellers look like, since sound won’t tell you.
- One team run with mandatory callouts. Vocalize every cue, even the ones you’re sure about. The multiplayer guide explains the roles — one player listens forward, one back.
Most players do none of this. They play forty runs reacting to noise and plateau at Door 50, because reacting to sound isn’t identifying it.
Failure Retrospective: The Muted-Game Wipe
A wipe that happens constantly, and the fix is free.
The error. A player keeps the sound low — or mutes it — because the horror audio is too intense. The early doors go fine; entities are slow enough to spot visually. Then the mid-game hits, where Blitz and Angler arrive with two-second warnings, and he dies over and over. He concludes the game is unfair or his reflexes are bad.
The cause. Without audio there is no early warning. Every death becomes a pure reaction-time problem, and reaction time always loses to an entity already in your face. He wasn’t slow. He was playing without the sensor the whole game is balanced around. The horror audio he muted was the warning system.
The recovery. SFX up to full, music down, headphones in, two on-purpose death runs to map the sounds. His survival rate past Door 50 jumped immediately — not because he got faster, but because he could finally hear the ambience cut three seconds before anything appeared. The muted-game wipe is the most avoidable death in Pressure, and it’s fixed with one slider.
The same loop hides a second failure: hiding for every sound. Players who react to every creak and drip burn stamina sprinting to lockers, then get caught leaving them when Pandemonium tests the door or Froger rebounds. The cure is the same training — learn the difference between a cue and background noise, and between an attack sound and an all-clear.
If-Then: What to Do for Every Sound
Train this until it’s automatic.
| You hear… | Then… | Because… |
|---|---|---|
| The ambience cut to silence | Get to the nearest locker and wait | Universal attack warning |
| A rising hum or static | Locker now, shut the door | Angler is closing in |
| A short high scream, no time | Nearest locker, instantly | Blitz gives no runway |
| A rhythmic croak | Locker, wait for two passes | Froger rebounds |
| A layered scream + screenshake | Locker, hold, don’t exit early | Pandemonium tests lockers |
| A chain rattle and wheeze | Locker, stay clear of doors | Chainsmoker grabs at range |
| A turret charge-up whine | Break line of sight now | It’s about to fire |
| Nothing, but you feel watched | Do NOT hide; scan and keep moving | Pinkie and Wall Dwellers beat stillness |
Counter-Intuitive Tips
Don’t hide for every sound. The game punishes both directions of the same mistake. Hiding for echoes, drips, and creaks burns time and stamina, and some of the worst deaths come from leaving a locker at the wrong moment rather than entering one. Learn what’s background noise and what’s a cue.
Learning the all-clear saves more lives than learning the attack sound. Everyone memorizes the roar; almost nobody memorizes the ambience fading back in. But the all-clear is what tells you it’s safe to move, and moving at the right time is where runs are won. A player who knows the release chains rooms without hesitation; a player who only knows the attack hides too long, every time.
In a group, deliberate noise is a tool. Solo, be silent. In a team, a loud “ANGLER LEFT” beats quiet deaths, because your teammate is hearing the same ambiguous echo and one wrong guess kills both of you.
FAQ
Why does the music stop right before an attack in Pressure?
The ambient soundscape dropping out is the game’s universal warning that an entity is incoming. The background drone — pipes, water, mechanical hum — cuts a second or two before an Angler-family entity arrives. Treat the silence itself as the cue. Get near a locker the moment the room goes quiet, even if you can’t tell which entity is coming. When the ambience fades back in, the threat has passed.
How do I tell Angler apart from Blitz by sound?
Angler’s warning builds slowly — a rising electronic hum or static that gives you a couple of seconds. Blitz is the same family but faster and higher-pitched, with a much shorter warning that ends almost as soon as it starts. In practice you won’t have time to tell them apart mid-run. The response is identical: nearest locker, immediately. If the sound gives you time to think, it’s Angler. If you barely register it before you’re dead, it was Blitz.
Do I need to hide for every sound I hear?
No, and hiding for everything is its own way to die. Echoes and aftersounds are not threats — an Angler’s fading hum after it passes is safe, and the ambience returning is the all-clear. Hiding for every creak and drip burns time and stamina, and some entities, like Pandemonium and Froger, punish you for leaving a locker at the wrong moment. Hide for attack cues and silence drops, not background noise.
What audio settings make entity sounds easiest to hear?
Use wired stereo headphones, not laptop speakers and not Bluetooth, which adds latency. Set SFX volume to 80 to 100 percent, and lower or mute the music — the score occupies the same frequency range as the Angler’s approach hum and can bury it. Keep master volume moderate, because Pressure’s dynamic range is huge: the screams will deafen you at max while the quiet ambient tells stay too quiet to notice.
What do I do if I can’t tell the entities apart yet?
Lean on the master rule: when the ambience stops, hide. You don’t need to identify an entity to survive it. The silence drop is the same for every Angler-family threat, and getting into a locker on that cue alone saves you from most of them. Learn the specific signatures later, at your own pace, while the ambience rule already keeps you alive through the mid-game.
Related Guides
- Pressure Entities Guide — Every Monster, Behavior & Counter
- Pressure Entities Identification Order — What to Learn First
- Pressure Entity Timing Windows — Exact Frames & Countdowns
- Pressure Entity Timing Guide — How Long to Hold the Locker
- Pressure Locker Hiding Mechanics — How to Survive Every Entity
- Pressure Survival Tips — General Advice for Longer Runs
- Pressure Beginner Guide — Start Here
- Pressure Multiplayer Guide — Team Callouts & Roles