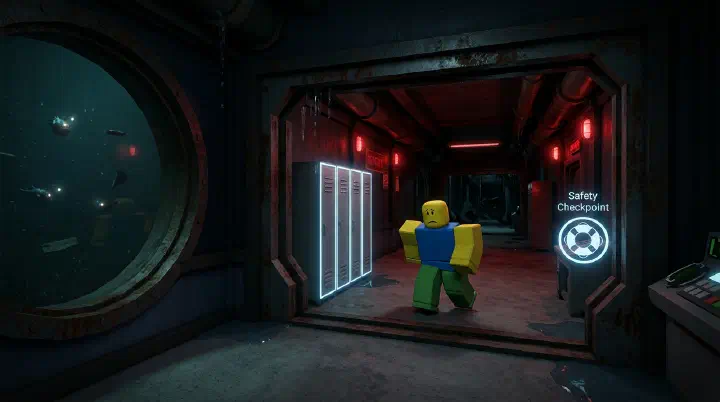
Your First 90 Seconds
The screen fades from black. You are in a dim hallway. Water drips overhead. Pipes line the walls. A fluorescent light buzzes. You have a flashlight with no instruction manual and no idea what is about to happen.
You walk forward. Room one is empty. Room two has a desk and a locker. Room three looks the same. You start to relax. Then the lights flicker once, hard. A clean high-pitched screech cuts through the ambient hum, rising like microphone feedback. You freeze. You look around. You see nothing. Then the screen goes black, and the word RUSH appears in red.
You are dead eight seconds into your first run. You do not know what you heard, what killed you, or what you could have done differently.
This cycle — enter, explore, die confused, repeat — defines every new player’s first hour. The game does not explain itself. It kills you, shows the name, and expects you to figure it out. Most players take ten deaths before they understand what they are listening for.
This guide changes that. It walks you from your very first spawn through your first successful run, explaining core mechanics as you need them, breaking down every entity you will encounter, and giving you the decision framework that turns confusion into survival. By the end, you will know exactly what killed you at room three, and you will never die that way again.
What Is Pressure?
Pressure is a Roblox horror survival game set in the Hadal Blacksite, an underwater research facility overrun by hostile entities. You descend floor by floor through procedurally generated rooms, collect items, solve puzzles, and avoid or survive encounters with fifteen distinct monsters. Death is permanent per run — you lose everything and restart from the surface. Between runs, you spend Credits (earned by surviving and dying) on loadout items that give you a head start on the next attempt.
The goal: reach the bottom of the Blacksite and extract. The challenge: the game teaches you nothing. Every mechanic, every sound, every entity behavior is discovered through death.
Core Mechanics: What You Actually Need to Know
Before the walkthrough, these five systems govern everything else. Understand them now and you stop making the mistakes that kill beginners before they learn anything.
Lockers Are Your Lifeline
Lockers are the primary defense against most entities. Press E to enter, press E again to exit. While inside, you are invisible to most threats. But not all lockers are functional — some are decorative props that look identical but cannot be entered. The only way to tell is to try. In your first few runs, press E on any locker you pass just to confirm it opens. This builds a mental map of real versus prop lockers that saves your life later.
Stamina Is Finite
You have a stamina bar that depletes when you sprint. It recharges slowly. Sprinting when no entity is chasing you leaves you exhausted when Rush screeches. Walk between rooms. Sprint only when you hear an entity cue. Managing stamina incorrectly is the second most common beginner killer after sound ignorance.
Health Does Not Regenerate
Your health bar stays where it is until you use a healing item. Bandages heal 25 HP. Medkits heal 50 HP. If you drop below 50 HP and have a healing item in a safe room, use it immediately. Carrying healing items into death is the definition of waste. The inventory is not a trophy case.
Credits Are Progress
You earn Credits by opening doors, surviving rooms, and yes — by dying. Even a death at room 3 gives you 15-30 Credits. Every 100 Credits is a step toward better gear. There is no penalty for dying except lost time. Treat early deaths as Credit farms with a free lesson attached.
Light Sources Fail
Every light source except the Gummy Flashlight has a battery that drains. When it dies, you are in darkness. Darkness makes you vulnerable to specific entities and makes navigation slow and dangerous. Your first purchase after enough Credits should always be the Gummy Flashlight because it removes this entire system from your mental load.
Why Beginners Fail: The Death Loop
New players do not die in Pressure because the game is unfair. They die because the game creates a self-reinforcing death loop that prevents learning.
The loop works like this: You enter a room. You do not know what to look for. An entity kills you. You learned nothing because you never saw or heard the entity clearly. You restart. You enter a new room. You die to a different entity. You have learned two things vaguely. On run three, you hear a sound but do not recognize it because you never survived long enough to hear it clearly. You die again.
The death loop has three specific failure points that this guide addresses directly.
Failure 1: Sound Ignorance. You die because you do not know what Rush sounds like. The fix is not “listen harder” — it is targeted exposure. The 3-minute audio drill (described below) gives you more Rush exposure in 30 minutes than 5 hours of cautious play.
Failure 2: No Room Entry Protocol. You enter rooms without scanning for lockers, exits, or hazards. When an entity appears, you panic-search for cover instead of moving to a location you already identified. The fix is a two-second habit that costs nothing.
Failure 3: Item Mismanagement. You hoard healing items, forget to swap to backup light, waste keycards on unlockable doors, or carry items you do not need. The fix is a loadout philosophy and a usage rule that most players never write down.
A beginner fixates on “getting good.” A survivor fixates on fixing these three specific failure points. The rest follows.
The Decision Framework
Every encounter in Pressure reduces to a three-question decision tree. Memorize it.
Question 1: Did I hear a sound? Yes or no. If yes, identify it. Clean rising screech = Rush (hide in locker). Distorted glitchy screech = Ambush (hide, count to 3 between passes). Whisper “psst” in darkness = Screech (spin 360 degrees). Deep roar with screen shake = Blitz (hide immediately, you have less time than Rush). Splashing or gurgling = Angler or Froger (hide in locker). If no sound but the lights just flickered hard, treat it as an incoming entity anyway.
Question 2: Is there a locker within reach? If yes, move to it. Do not sprint unless the locker is far. If no, identify the nearest alternative hiding spot — a side room with a door, a corner that might break line of sight, or the previous room you already cleared. Do not freeze. Freezing is death.
Question 3: What is my exit condition? After hiding, how do I know it is safe to leave? Rush: wait for the screech to fade completely, then exit. Ambush: count to 3 after each pass; exit after 3 seconds of silence. Screech: look at its eyes and it vanishes instantly. Figure: wait for its footsteps to recede, then walk, never sprint. Eyes: look at the floor immediately and navigate by peripheral vision.
This framework replaces panic with process. The first few times you use it, you will be slow. That is fine. Speed comes with practice. The framework ensures you are making a decision rather than freezing.
Your First Run Walkthrough
This walkthrough assumes you have installed Pressure, clicked Play, and are standing in the first hallway with nothing in your inventory. Follow these steps.
Step 1: The First Room
Stand still for five seconds. Look around. Notice the pipes, the flickering lights, the ambient hum. This is the baseline soundscape. Memorize it. Every entity sound is a deviation from this baseline. If you do not know what normal sounds like, you cannot detect abnormal.
Walk to the locker in the corner. Press E. It opens. Press E again to exit. This is your first functional locker check. Now walk through the door.
Step 2: Rooms 1-5 (The False Calm)
Floors 1 through 5 are deceptively quiet. Rush can spawn here but rarely does. Use these rooms to practice the Room Entry Protocol:
- Open the door.
- Pause. Identify the nearest locker.
- Identify the next exit.
- Then enter and explore.
Do this for every single room. Every time. It takes two seconds. By room 10, it will be automatic. This single habit prevents more deaths than any item in the game.
Between rooms, walk. Do not sprint. There is no time pressure yet. If you find a bandage, pick it up. If you find a keycard, keep it. If your flashlight is on, turn it off in well-lit rooms.
Step 3: The First Screech (Likely Between Rooms 3-5)
The room goes dark. Not dim. Dark. Then you hear it: a soft whisper. “Psst.”
This is Screech. Do not run to a locker — lockers do not help here. Instead, spin in a full 360-degree circle. Spin smoothly, not in jerky panicked movements. Screech’s eyes glow white somewhere in the room. Your crosshair will cross them during the spin. The moment it does, Screech vanishes. Zero damage. If you fail to find its eyes in 3 seconds, it attacks for heavy damage.
The spin technique only works in first-person view and only if you are not sprinting. If you are sprinting when the whisper hits, stop, then spin.
Note what just happened: you identified the entity by sound, you knew the counter, and you executed without panic. This is the first time the decision framework worked for you. Remember this feeling.
Step 4: Rooms 6-10 (Rush Enters)
By floor 6, the game’s primary killer can appear. The lights flicker once — not the slow pulsing of ambient lighting, but a sharp single flicker. Then the screech. Clean, bright, rising in pitch. Rush is coming.
You have 3.5 seconds. Do not look for where the sound is coming from. Look for where the nearest locker is. You already identified it when you entered the room. Walk to it, enter, close the door. Wait. The screech builds to a peak, then fades. Wait one more second after it fades. Then exit and continue.
Three mistakes to avoid:
- Entering a prop locker (which is why you should test lockers early in a run)
- Exiting too early while Rush is still passing (the screech fading means it passed, not that it stopped)
- Sprinting to the locker when walking would suffice (wasted stamina)
Step 5: Rooms 11-15 (Ambush Introduced)
Starting around floor 10, Rush’s sound may sound wrong. Distorted. Glitchy. Lower pitched. This is Ambush, a variant that passes through the room multiple times.
The sound cue is unmistakable once you have heard it: imagine Rush’s clean screech played through a blown speaker. If you hear this, enter the locker. After the first pass, count to 3. If you hear another screech within 3 seconds, stay in the locker and count again. Repeat until 3 seconds pass with silence. Then exit.
The most common death: exiting after the second pass when a third is coming. Always count to 3. Extra waiting is free. Exiting early is a corpse.
Step 6: Rooms 16-20 (Eyes)
Enter a room. The screen tint shifts purple. This is Eyes. Immediately look at the floor. Navigate using your peripheral vision, following walls to find the exit. If you look at Eyes directly, you take roughly 8% HP per second of eye contact. A three-second glance costs a quarter of your health bar.
Eyes rooms follow the same layout every time. Once you have seen one, you have seen them all. The exit is always in the same relative position. Practice wall-following with your gaze down.
Step 7: The First Safe Room
Between major sections, you will encounter safe rooms — areas where entities cannot spawn. These have lockers, item spawns, and sometimes healing stations. Use these to:
- Heal if below 60 HP
- Reorganize inventory
- Check battery status
- Breathe
Do not sprint through safe rooms. They are the only places you can relax. Use them.
Step 8: Beyond Floor 20
If you have reached floor 20, you are past the beginner wall. The entity spawn rate increases. You will encounter Angler (low wet roar, hide in locker), Blitz (faster charge, less reaction time), and nodes that require puzzle solving like the keycard door and the figure-eight lock.
Your survival from here depends on the foundation you built in the first 20 floors: sound recognition, the room entry protocol, and the decision framework. If you have those, you have the tools to handle anything the game throws at you. If you do not, the deeper floors will expose every gap in your knowledge.
Entity Encounters Explained for Beginners
You do not need to memorize all fifteen entities before your first run. You need to recognize the five that will kill you in the first 30 floors. The rest you will learn through gradual exposure.
| Entity | What You Hear | What You See | What You Do | Beginner Death Rate |
|---|---|---|---|---|
| Rush | Clean rising screech, 3.5 sec warning | Lights flicker once | Enter nearest locker, exit after pass | Highest |
| Ambush | Distorted glitchy screech | Lights flicker multiple times | Enter locker, count to 3 between each pass | Very High |
| Screech | “Psst” whisper in dark room | Room goes dark | Spin 360 degrees to find its eyes | High |
| Angler | Low wet gurgling roar | Lights flicker, water drips | Enter locker, wait for roar to pass | High |
| Blitz | Short sharp roar with screen shake | Screen shakes | Sprint to nearest locker immediately | High |
| Eyes | Low humming | Purple screen tint | Look at the floor, navigate by touch | Medium |
| Figure | Heavy breathing, footsteps | Large blind humanoid | Walk only, freeze when it listens | Medium (Door 50+) |
| Pinkie | No sound cue | Pink humanoid visible in corridor | Sprint forward, lockers do NOT work | Medium |
The death rate column tells you what to prioritize. Learn Rush, Ambush, and Screech first. Everything else comes after.
Counter-Intuitive Advice That Saves Runs
Pressure teaches you one set of rules, then breaks them. Here are four situations where the obvious play is the wrong play.
1. Sometimes the Safe Locker Is the One You Do Not Take
If Rush screeches and the nearest locker is a prop you have not tested, do not gamble on it. Sprint to a different locker you know is real, even if it is further away. The distance penalty is smaller than the death penalty of entering a prop. This contradicts the beginner instinct to take the closest option. Closest is not always safest.
2. Hiding Is Not Always the Answer
Every beginner learns “hear bad sound, hide in locker.” But Pinkie ignores lockers entirely. If you see pink and hide, you die inside the locker. The correct response to Pinkie is to sprint forward and put distance between you and her. The same applies to certain environmental hazards where lockers provide no cover. Learning when NOT to hide is as important as learning when to hide.
3. You Should Die on Purpose
The fastest way to learn entity sounds is to stop trying to survive and start trying to die. Sprint through rooms. Do not hide. When Rush comes, let it kill you. Die ten times in a row to Rush. In 30 minutes, you will have heard the screech 15-20 times, which is more Rush exposure than 5 hours of cautious play where you hide successfully. This feels wrong because every instinct says “survival first.” But deliberate failure produces faster learning than cautious avoidance.
4. Credits from Dying Are More Valuable Than Credits from Surviving
A death at room 3 gives you 15-30 Credits in seconds. A partial clear to room 20 takes 20 minutes and gives you 40-60 Credits. The Credits-per-minute ratio of dying is significantly higher than surviving. For your first 5-10 runs, treat Credit acquisition through deaths as your primary income source. Build your bankroll, then use it on runs where you actually try to survive. Most beginners try to survive every run and end up broke and frustrated. The smarter path is to die efficiently first, then survive with gear later.
FAQ
Q: I died before I even saw anything. What killed me?
A: Rush. Rush spawns as early as floor 3. It announces itself with a clean high-pitched screech that rises in pitch, then charges through the room at high speed. If you were not in a locker within 3.5 seconds, you died before you even knew what hit you. Rush is the number one beginner killer in Pressure. Your fix: every time you enter a room, pause half a second and identify the nearest locker before doing anything else. When you hear the screech, you will already know where to go.
Q: How many runs until I get my first win?
A: Most new players need 15-30 runs before their first clear. The first 5-10 runs should be ‘discovery runs’ where you expect to die and focus only on learning entity sounds. Runs 10-20 are ‘partial clears’ where you aim for floor 30-40. By run 20-30, with proper loadout and sound recognition, you can push for your first full clear. Players who do the 3-minute audio drill (dying to Rush on purpose 10 times in a row) cut this by roughly half.
Q: Do I need to buy items before my first run?
A: No. Your first 3-5 runs should be zero-investment discovery runs. Sprint through rooms, let entities kill you, and learn their sounds. Once you have 250+ Credits from deaths and partial clears, buy the Essential Starter Loadout: Gummy Flashlight (150 Credits, never needs batteries) and 2 Medkits (100 Credits). That is all you need for runs 6-20. The Gummy Flashlight removes battery management from your mental load entirely.
Q: What is the single most important skill to learn first?
A: Audio-to-entity mapping. Every entity in Pressure announces itself with a unique sound before it attacks. If you can hear a sound and know exactly which entity it is and what to do within 1 second, you will survive 90% of encounters. The three sounds to learn first: Rush’s clean rising screech (hide in locker), Screech’s ‘psst’ whisper (spin 360 degrees to find its eyes), and Ambush’s distorted glitchy screech (hide and count to 3 between multiple passes). Learn these three and you stop dying before floor 20.
Q: Is Pressure harder than other Roblox horror games?
A: Pressure is significantly harder than most Roblox horror games because it combines permadeath, procedural room generation, fifteen entities with unique mechanics, and no traditional tutorial. Games like The Mimic or Doors have simpler threat patterns. Pressure expects you to learn through repeated failure, which is punishing but rewarding. The good news: once you learn the patterns, they apply consistently. Pressure does not cheat — every death is avoidable, and every entity has a counter.
Q: I keep dying in lockers. What am I doing wrong?
A: Three common locker deaths: (1) You hid from Pinkie — Pinkie ignores lockers entirely; if you see pink, sprint, don’t hide. (2) You exited during an Ambush multi-pass — Ambush passes 2-6 times; count to 3 of silence after each pass before exiting. (3) You entered a prop locker — some lockers are non-functional props; test near the start of a run by pressing E on a locker to confirm it opens before you need it in an emergency.
Q: Should I play solo or multiplayer for my first win?
A: Multiplayer is strongly recommended for your first 10-15 runs. Teammates can call out entity types, share items, signal safe lockers, and revive you from certain deaths. The safety net dramatically reduces the learning curve. Once you can consistently reach floor 40 in multiplayer, switch to solo runs to build independent survival skills. Most players get their first win in multiplayer, then learn to solo.
From Beginner to Survivor
The difference between a beginner who dies at room 3 and a survivor who clears the Blacksite is not reaction time or mechanical skill. It is knowledge. The survivor knows what Rush sounds like. The survivor has the room entry protocol automated. The survivor uses the decision framework instead of panic.
You now have that knowledge. The next step is installing it through practice. Run the 3-minute audio drill. Practice the room entry protocol until it is automatic. Use the decision framework every time something happens. Die a lot. Learn from each death. The first win will come.
Scared survivors are still survivors. Everyone who has cleared the Blacksite started exactly where you are now.
Related Guides
- Pressure Beginner Guide — Your First 20 Floors, Entity Sound Recognition & the Credit-Earning Protocol
- Pressure Entities Guide — Every Monster, Its Audio Tell & the Exact Counter
- Pressure Entity Timing Windows — Exact Seconds to React
- Pressure Beginner Mistakes — 15 Ways You Keep Dying at Door 47 With Full Inventory
- Pressure Survival Tips — The 10 Rules That Take You From Floor 20 to Floor 100
- Pressure Items & Puzzles Guide — What to Buy & Every Puzzle Solved
- Pressure Audio Identification Guide — Why You Keep Mixing Up Sounds and Dying at Door 70
Disclaimer: This guide is based on Pressure as of July 2026. Game updates may change entity behavior, item mechanics, and room generation. The “Half A Slice Of Cake” update (March 2026) introduced 200+ item skins, 260+ charms, and 50+ modifiers that can affect gameplay. Always check the latest game version and official wiki for current information.
Sources: