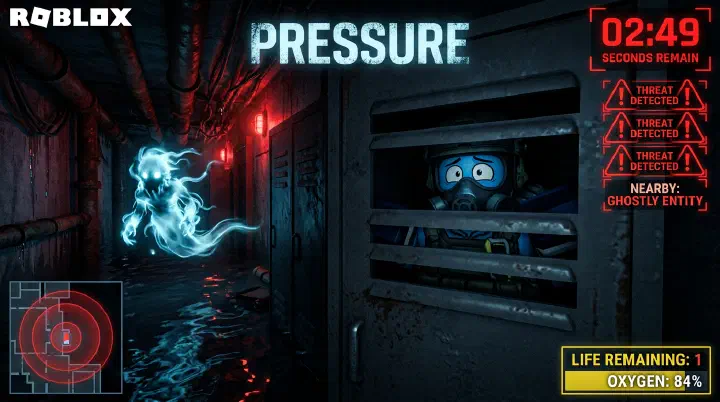
You hear the Angler’s gurgle. Your muscles lock up. You’ve died to it seventeen times, so now you know the sound by heart. You sprint to the nearest locker, slam the door, and hold your breath. The wet, dragging noise passes. Silence returns. You count to two—old habit from other Roblox horror games—and step out.
Three seconds later, Froger blasts you into a wall.
You knew the sound cue. You hid perfectly. You even waited a little. But you stepped out during the overlap danger zone, and the game punished you for treating Pressure like a reaction test instead of a rhythm game. Sound cues are the tutorial. Timing is the exam.
This guide isn’t a list of audio files. It’s the cooldown logic that actually decides whether you live or die.
Why Sound Cues Are Only Half the Battle
Most players learn Pressure backwards. They memorize the Angler’s groan, Froger’s chirp, Blitz’s electrical snap. That’s useful, but it’s frontend knowledge. It tells you what is coming. It doesn’t tell you when the next thing is coming.
The game doesn’t wait for you to feel safe. Its spawn system runs on independent timers that don’t care about your heartbeat. When Angler spawns, it doesn’t “use up” the game’s aggression budget. It triggers a short cooldown, sure—but that cooldown is short enough that a second entity can spawn before you’ve even stopped shaking.
Here’s the death pattern that shows up in every squad: Player hides from Entity A. Entity A leaves. Player exits immediately because “the danger is over.” Entity B was already in its spawn window during Entity A’s chase. Since Entity B’s audio cue plays at spawn—not at a polite distance from the player—the cue was muffled or missed while the player was panicking inside the locker.
You didn’t hear Froger because you were already hiding. That’s not bad luck. That’s a mechanic you can predict.
The Safe/Unsafe Window System
Stop thinking about entities as individual monsters. Think about the timeline after every spawn as a set of colored zones.
Zone 1: The Hard Hide (0–8 seconds)
This is the entity’s active duration. You’re inside the locker, under a bed, or sprinting through a bait room. You are not safe. You are actively surviving. During this window, the spawn system is usually locked. Most entities cannot overlap in the exact same second. But the lock is short.
Zone 2: The Residual Danger (3–12 seconds after audio ends)
This is where most deaths happen. The entity is gone. The audio stopped. Your brain screams “all clear.” The spawn cooldown, however, has already expired. Pressure’s aggressive entities can roll a new spawn roughly 3–5 seconds after the previous threat finishes its path. If you exit at second 2, you walk straight into the next spawn’s kill radius with no cover nearby.
Zone 3: The Soft Safe (12–25 seconds)
New spawns are possible here, but the probability curve dips. You’ve passed the tight overlap window. If you absolutely need to move, search drawers, or backtrack, this is your best shot. It’s not a guarantee. It’s a calculated risk.
Zone 4: The False Calm (25+ seconds)
No spawn for a while? Great. Except some players get sloppy here. They start looting slowly, chatting in voice, ignoring corners. The spawn system doesn’t have a mercy timer. A 40-second quiet stretch means nothing. Treat every room entry like the timer just reset.
The key takeaway: the real danger isn’t the entity you heard. It’s the entity that spawns before you regain situational awareness.
How Each Entity Manipulates Your Clock
Different entities stretch or shrink these zones. You can’t treat Angler and Blitz with the same mental timer. Here’s how the major threats warp the Safe/Unsafe Window System.
Angler — The Baseline Thief
Angler is the reference point for every other timer because it’s the most common. You get about 3–4 seconds of audio warning before it reaches your room. The chase itself lasts roughly 5–7 seconds as it drags past lockers and corridors. That feels long when you’re inside.
But Angler’s real damage is psychological. Its audio is loud, wet, and unmistakable. When it ends, your brain registers “threat over” harder than with any other entity. That’s the trap.
Angler’s spawn cooldown is on the shorter side. After it clears, you have roughly 3–5 seconds of guaranteed silence. After that, the dice roll again. If you exit your locker the instant Angler’s gurgle fades, you’re stepping out at the exact moment Froger or Blitz can legally spawn.
Angler rule: Stay in the locker for a full 5-second count after the audio ends. Not 2. Not 3. Five. Whisper it. “One-thousand, two-thousand…” It feels stupid. It saves runs.
Froger — The Overlap Killer
Froger is why this guide exists. Its spawn window is more aggressive than Angler’s, and its kill speed is faster. You get maybe 2 seconds of warning audio—less if ambient noise is high. It doesn’t wander. It targets.
The overlap death works like this: Angler spawns. You hide. While you’re in the locker, Froger’s spawn timer hits. Because you’re already hidden, you don’t hear Froger’s cue—or you hear it as a faint background blip and assume it’s part of Angler’s tail audio. Angler leaves. You exit. Froger was already waiting, or spawns the moment you open that locker door.
Froger doesn’t care if you just survived something else. It doesn’t queue politely. In Pressure, entity spawns are checks, not turns.
Froger rule: If you just survived any locker-hiding entity, double your wait time. Froger is the most common second-spawn threat because its timer aligns cruelly well with Angler’s cooldown. When in doubt, count to 8 before leaving cover.
Blitz — The Zero-Window Threat
Blitz is the exception that proves the system. Its warning is a sharp electrical crackle that gives you under 2 seconds to react. Sometimes less if you’re in a large room and the audio falls off.
Blitz doesn’t create an overlap danger for other entities as much as it creates an overlap danger with itself and ambient spawns. Because its chase is lightning-fast, players often reflexively leave cover immediately. But Blitz’s speed means the cooldown window starts earlier than you expect. The game considers Blitz “finished” the moment it exits the room, not when you stop shaking.
That means the 3–5 second overlap zone starts sooner. Players who hide from Blitz, hear silence, and peek out are sometimes walking into a second Blitz—or an Angler that rolled immediately after.
Blitz rule: After Blitz, wait 5 seconds minimum, same as Angler. Do not let its speed trick you into thinking the danger passed faster. The cooldown clock starts early.
Ambient and Secondary Entities
Pressure isn’t just rushers. Environmental threats—flooded sections, light outages, pressure doors—don’t always have spawn cooldowns tied to the entity RNG system. They run on room triggers or timer events. That means you can have an Angler chase during a flood sequence, or a blackout that masks Froger’s audio cue.
These aren’t overlaps in the strict cooldown sense. They’re compounding disasters. When the lights drop, your safe window shrinks because your information shrinks. You can’t hear as well. You can’t see locker indicators. The system doesn’t give you more time to compensate. It gives you less margin for error.
Ambient rule: During any environmental event, add 3 seconds to every hide timer. If you’d normally wait 5, wait 8. The game is already eating your sensory bandwidth. Don’t let it eat your patience too.
The Timing Meta: Reading the Room Instead of Memorizing Numbers
Memorizing “5 seconds after Angler” is a starting point, not a strategy. The timing meta is about reading state, not reciting numbers.
Pressure’s spawn system isn’t fully random. It uses a weighted probability pool that shifts based on your progress, your current room type, and your squad size. Solo players see fewer overlapping spawns because the system has fewer targets to punish. Full squads of four trigger more aggressive rolls because the game assumes more eyes and ears.
That means the “exact” timing windows shift slightly based on context. A 5-second wait might be overkill in solo runs and barely enough in four-player lobbies. You need to calibrate.
Here’s the calibration method: track your deaths for 10 runs. Not your escapes—your deaths. Note which entity killed you, and whether it was the first spawn or a follow-up. If 60% of your deaths are follow-up spawns, your wait times are too short. If 60% are first-spawn deaths, your audio recognition needs work, not your timing.
Most players who complain about “bad RNG” are actually dying to predictable overlap patterns they never learned to respect.
Counter-Intuitive Truths That Save Runs
Some of Pressure’s timing logic feels backwards until you see it in action.
Staying in the locker 2 seconds longer than you think you need is usually the difference between life and death.
Your brain is calibrated for other Roblox horror games where entities spawn in turns. Pressure doesn’t. That extra 2 seconds covers 90% of overlap deaths. It feels boring. Boring is alive.
Some entity combinations are actually safer than single spawns.
If Blitz spawns during an Angler chase, Blitz often pathfinds through without interacting with your locker because the room state is already “occupied” by a major threat. You’re not safe—you’re just not Blitz’s target in that second. The danger isn’t the combo. The danger is exiting after Angler while Blitz is still resolving its path. Wait for both audio tails to end.
Running into a new room isn’t escaping the timer.
Entity spawns are room-based, but cooldowns are run-based. Sprinting three rooms ahead doesn’t reset your overlap window. It just gives you fewer lockers to work with when the next roll hits.
The quiet moments are the deadliest.
After a double-spawn scare, players relax hard. Their adrenaline crashes. They make sloppy decisions. The game doesn’t care about your adrenaline. The cooldown clock is indifferent to your feelings. The 30-second quiet stretch has killed more squads than the 5-second chaos because players stop counting.
Practical Drill: The 10-Run Locker Test
If you want to internalize this guide instead of just reading it, run this drill.
Pick any standard Pressure run. Don’t go for speed. Go for survival. Every time you enter a locker, start a mental count. Don’t exit until you hit 5 seconds after the last audio cue—no matter what. If you die because you stayed in too long and something caught you on exit, note it. If you die because you left early, note it.
After 10 runs, you’ll have data. Most players find they died zero times from staying in too long, and three to four times from leaving early. That ratio tells you everything about where your actual problem lives.
When to Break the Rules
There are exactly two times to leave a locker early.
First: environmental collapse. If the room is flooding, burning, or crushing, you take the overlap risk because staying is guaranteed death. In that case, exit with a plan—sprint directly to the next locker or safe corner, don’t loot, don’t look back.
Second: squad communication. If a teammate has eyes on the hallway and confirms clear, you can shave 1–2 seconds off your count. But their callout needs to be instant and certain. “I think it’s clear” is not a callout. “Hallway empty, I’m watching” is.
Every other situation obeys the window. Break it because you chose to, not because you got impatient.
Final Word: Pressure Is a Rhythm Game Wearing a Horror Costume
The jump scares get the clips. The timing gets the wins. Pressure rewards players who treat it like a rhythm game—counting beats, respecting rests, knowing that the silence between notes is still part of the music.
You don’t need to memorize every frame-perfect spawn trigger. You need to respect the overlap. You need to understand that the locker isn’t just a tool for surviving the entity you heard. It’s a tool for surviving the entity you didn’t hear because it spawned while you were already inside.
Learn the sound cues, sure. They’re your early warning. But early warning means nothing if you walk into the second punch while you’re still recovering from the first.
Count to five. Stay boring. Let the impatient players fill the death counter. You’re playing for the exit.