You finally see it.
A Sea Beast breaks the water on the horizon. Your crew starts yelling. You turn too hard, clip a wave, and fight the camera. Then you fire every cannonball you brought.
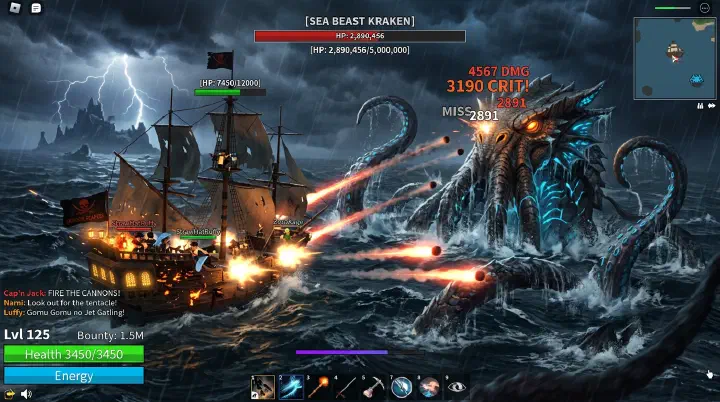
The first 20 shots miss.
The next 20 hit, but the health bar barely moves.
By the time fruit skills and sword damage reach it, the Beast is drifting away. Someone falls in the water. Someone else dies to the slam. You get it down to 15% HP.
Then it despawns.
No Bloodline Stone. No Clan Reroll. No rare drop. Just an empty ocean and one wasted hour.
That run didn’t fail because you were unlucky. It failed because you treated Sea Beast hunting like random sailing. In Sailor Piece, ocean bosses punish loose routing, weak spawn control, and bad damage priority.
If you need basic ship controls, start with the Sailor Piece Ships & Navigation Guide. If your land boss damage is weak, read the Sailor Piece Boss Strategies Guide before trying serious ocean farms.
Why Wandering the Ocean Doesn’t Work
The worst Sea Beast strategy is also the most common one:
- spawn a ship,
- sail in a straight line,
- complain after 25 minutes,
- turn around,
- repeat until everyone leaves.
That feels active. It is not efficient.
Sea Beast hunting is built around three checks: zone, distance, and spawn pressure.
You need Sea 2 unlocked. You need at least 500,000 bounty. Your ship needs to sit far enough from islands for ocean spawn rules to activate. In practice, stay around 200–600 studs away from land and wait until the game treats you as being in open water.
Drift too close and the hunt breaks. Sail too far and you waste time regrouping. Split boats and you lose stacked bounty value.
The despawn timer is the other killer.
A Sea Beast is not a training dummy. Once it appears, you have a limited window to tag it, stabilize aggro, and finish. Slow starts, missed shots, and dead DPS all matter.
Random sailing creates random fights. Random fights create 15% HP despawns.
Your goal is controlled spawns inside a small hunting box where your crew is already stacked, supplied, and facing the right direction.
Spawn Zone Priority System
Use this priority list instead of wandering.
Priority 1: Open Sea edge near a safe island
This is the best default zone for most crews.
Sail out from a Sea 2 island until Open Sea is active, then stop pushing deeper. Stay in the 200–600 stud band. Keep the island behind you as a reference point.
Use this zone when:
- your crew has mixed levels,
- players still die to slam attacks,
- you need consistent kills,
- you are farming guaranteed drops.
Do not hug the island. Safe land does not help if the spawn check is off.
Priority 2: Deep Sea lane for strong crews
Deep Sea routes are better only when your group kills fast and survives mistakes. Use them when your builds are strong, everyone knows the attacks, and the driver can hold medium range.
If your last three kills took more than 8 minutes each, don’t go deeper. Fix your damage first.
Priority 3: Small patrol route
A moving route is backup, not default. Use a slow 2–3 minute triangle between safe open-water points only when spawns feel dry. Keep everyone on one ship and away from land.
A good patrol route refreshes position. A bad patrol route becomes a world tour.
Bounty Is Your Real Bait
Most players talk about luck. Strong crews talk about bounty.
Sea Beast spawn rate improves with higher combined bounty. Your “bait” is the total bounty sitting together in the active ocean zone.
A solo player with low bounty can still see spawns, but the gaps feel awful. A stacked group can turn the same ocean into a farm.
| Group Setup | Expected Feel | Use Case |
|---|---|---|
| Solo under 5M bounty | Long dry streaks | Testing routes only |
| 2–4 players around 10M total | Playable but inconsistent | Casual farming |
| 4–8 players around 20M+ total | Strong spawn pace | Main farming setup |
| Large group near bounty cap | Back-to-back pressure | Dedicated drop farming |
The exact timer can shift by server and update, but the rule stays the same. More valid bounty in one hunting box means more spawn pressure.
This is why a weaker player with high bounty can be more useful than a stronger player who keeps leaving the zone. Stay together. Don’t split boats unless you are intentionally scouting.
For role planning, read the Sailor Piece Crew & Ship Guide before hosting long farms.
Counter-Intuitive Advice: Stop Chasing Every Spawn
This sounds wrong, but it saves runs.
Do not chase every Sea Beast the second someone sees movement.
If the Beast appears outside your kill box, chasing it can waste more time than letting it go. Ranged players lose angle. Melee jumps too early. The fight starts out of position.
That is how you lose a kill at 15% HP.
Use a pull-first mindset:
- turn the ship slowly,
- keep the Beast in front of your damage players,
- let ranged attacks tag first,
- wait for aggro to stabilize,
- burst after the first big attack.
If the spawn is too far, too close to land, or moving into bad terrain, skip it. Stay in the box and force the next clean attempt.
Bad players chase health bars. Good farmers protect the route.
Ship Build That Actually Helps DPS
Your ship does not replace your build. Your fruit, sword, melee stats, and Haki still carry the kill. But ship setup decides whether your damage gets uptime.
You want stability, not style.
Bring:
- enough cannonballs for tags and emergency finishers,
- a ship with clean deck space,
- one driver who never jumps off mid-fight,
- ranged players on the front and sides,
- melee players who wait for safe windows,
- everyone on the same boat before the spawn check.
Do not overvalue cannon damage. Cannons are for tags and pressure. If your crew needs 80 cannonballs for one Beast, your character damage is the problem.
For fruit choices, burst and safe ranged uptime matter most. High-output options beat flashy moves that miss on water. The Sailor Piece Devil Fruits Guide can help.
A clean kill usually looks like this:
- Driver holds medium range.
- Cannons or ranged fruit skills tag the Beast.
- Everyone waits for the first big attack.
- Players dodge, then burst during recovery.
- Melee commits only when the Beast is not mid-slam.
- Strongest cooldowns finish the last 25% HP.
Low HP is when you play cleaner, not greedier.
Kill Priority During the Fight
Sea Beast fights are not just “hit the boss.” Use priorities.
First, keep the driver alive. If the driver dies, the ship loses position. If the ship loses position, ranged players lose uptime. Pick someone patient. Their job is boring and important.
Second, keep damage uptime. Dead players deal no damage. Swimming players deal almost no damage. Stay on deck unless your build is made for safe water combat.
Third, burst after attacks. Most crews waste big moves while the Beast is moving. Wait for it to commit. Dodge the slam or projectile. Then dump damage while it recovers.
Fourth, secure the last 25%. Stop saving cooldowns. Use Z-specs, high-damage fruit skills, and safe cannon shots. If someone dies here, do not wait unless your DPS is too low. Finish the kill.
If you keep failing at low HP, your issue is not spawn rate. Your issue is end-phase discipline.
Farming Route for 5+ Kills Per Hour
This route assumes a prepared Sea 2 group with enough combined bounty to keep spawns moving. Solo players should not expect the same rate.
Start at a Sea 2 island with fast ship access. Put everyone on one boat. Check supplies before leaving. If someone is still changing fruits, rolling stats, or looking for quests, do not start the timer.
Sail into Open Sea until your hunting condition is active. Stop inside the 200–600 stud band. Face the ship away from the island, but keep the island visible behind you. That gives the driver a reference point.
Run this loop:
- Wait in the box for a spawn.
- If nothing appears after several minutes, make one small triangle patrol.
- Return to the same box.
- Kill only spawns you can engage cleanly.
- Reset dead players after each kill, not during the fight.
- Restock only when supplies drop below one more full kill.
Most groups lose kills between fights. They argue about drops, sail away, split ships, and lose ten minutes. Treat every kill like a rotation: 2 minutes to trigger, 3–6 to kill, 1 to reset.
That is how you reach five or more kills per hour. Not by sailing farther. By deleting dead time.
If your account still needs levels, fix that first with the Sailor Piece Leveling & XP Guide. Sea Beast farming is endgame content. Underleveled players turn every spawn into a rescue mission.
Common Mistakes That Ruin Sea Beast Farms
The biggest mistake is splitting the crew. Two ships feel flexible, but they create messy aggro and split bounty pressure. Use one ship unless you have a planned scout.
The second mistake is sailing too close to islands. Land feels safe, but it does not matter if the spawn condition is off.
The third mistake is starting with no supplies. Bring extra cannonballs, but do not make them your main DPS.
The fourth mistake is letting the wrong player drive. If they panic-turn every time the Beast moves, everyone misses.
The fifth mistake is greed. If the Beast is badly positioned, reset the angle. If the crew is dead, stop pulling deeper.
Sea Beast Hunting FAQ
Why did my Sea Beast despawn at low HP?
Usually because the fight took too long or the Beast got pulled into a bad position. Slow tags, missed shots, dead DPS, and long chases burn the timer. Start inside a controlled box.
Should I farm Sea Beasts solo?
Only if you are testing routes or already have very high damage. Solo farming works, but it is slow and inconsistent because you lack stacked bounty and backup DPS. A small organized group is much better.
Is Deep Sea always better than Open Sea?
No. Deep Sea is better only if your crew can kill fast and survive mistakes. If players are dying, Open Sea edge farming gives better hourly rewards because recovery is faster.
How many cannonballs should I bring?
Bring enough for tags, missed shots, and emergency finishers. If cannonballs are your main damage source, your build is not ready.
What matters more: rare drops or guaranteed drops?
For long farms, guaranteed drops matter more than one lucky rare. Bloodline Stones and Clan Rerolls add up. Build your route around kills per hour first. Rare drops come from volume.
Final Route Checklist
Before you start, check this:
- Sea 2 unlocked.
- At least 500,000 bounty.
- Group stacked on one ship.
- Open Sea condition active.
- Ship parked 200–600 studs from land.
- Driver assigned.
- Cannonballs stocked.
- Burst cooldowns ready.
- Everyone knows not to chase bad spawns.
Sea Beast hunting looks random when you sail randomly. Once you control the zone, stack bounty, protect the driver, and kill inside a tight route, the ocean stops feeling empty.
You are not waiting for luck anymore.
You are farming a system.