Last updated: May 10, 2026. This guide covers all enemy types, boss mechanics, and wave patterns in Tower Defense Simulator as of May 2026, including the latest 2026 balance update changes.
Why Knowing Enemies Is Your Biggest Advantage
In Tower Defense Simulator (TDS), towers are only half the equation. If you don’t understand what you’re fighting — enemy HP, speed, abilities, resistances, and wave timing — even the best tower setup will fail. Every map has a unique enemy composition, and every gamemode scales enemies differently.
For a complete ranking of all towers to counter each enemy type, see the TDS Towers Tier List.
This guide breaks down every enemy type, boss mechanic, and wave pattern so you can plan your defenses with precision.
Basic Enemy Types
Common Enemies
These enemies appear on almost every map and form the backbone of most waves.
| Enemy | HP (Normal) | Speed | Description | Counter Strategy |
|---|---|---|---|---|
| Normal | Low | Slow | Basic walking enemy. The tutorial enemy. | Any damage tower handles these easily |
| Slow | Medium | Very Slow | Takes longer to traverse the path but has more HP than Normal. | Basic towers; no special strategy needed |
| Fast | Low | Fast | Reaches your base quickly despite low HP. Can overwhelm unprepared defenses. | Fast-firing towers (Scout, Accelerator) or slowing towers (Freezer) |
| Hidden | Low | Medium | Invisible to towers until revealed. Requires detection towers. | Radar tower or towers with detection abilities |
| Ducky | Low | Medium | Cute rubber duck enemy. Low threat but appears in large numbers. | AoE towers (Pyromancer, Mortar) |
Tough Enemies
These enemies require specific strategies and cannot be handled by basic towers alone.
| Enemy | HP (Normal) | Speed | Description | Counter Strategy |
|---|---|---|---|---|
| Tank | High | Slow | Massive HP pool. Takes significant damage to defeat. | High DPS towers (Accelerator, Rocketeer) with buffer support |
| Armored | High (with armor) | Medium | Has damage-reducing armor. Normal towers are less effective. | Pyromancer (burn ignores armor) or high burst damage |
| Shielded | Medium | Medium | Carries a shield that blocks damage until destroyed. | Focus fire on shield first, then the enemy |
| Healer | Medium | Medium | Heals nearby enemies over time. Priority target. | Eliminate healers first before they sustain other enemies |
| Boss | Very High | Slow | Mini-boss enemy with large HP pool. Appears at key wave thresholds. | All DPS focused, buffer towers maxed |
Special Ability Enemies
| Enemy | HP (Normal) | Speed | Special Ability | Counter Strategy |
|---|---|---|---|---|
| Burn-Immune | Varies | Varies | Cannot be damaged by fire/burn effects. Pyromancer is useless. | Electroshocker, Accelerator, or any non-fire damage |
| Stun-Resistant | Varies | Varies | Resists or is immune to stun effects. Freezer/Electroshocker less effective. | Pure DPS towers; don’t rely on crowd control |
| Swarm | Very Low | Fast | Appears in groups of 10+. Individually weak but overwhelming in numbers. | AoE towers (Mortar, Pyromancer, Rocketeer) |
| Teleporter | Medium | Varies | Can teleport past sections of the path. Unpredictable positioning. | Dense tower coverage; don’t leave gaps |
| Explosive | Medium | Medium | Explodes on death, damaging nearby towers. | Kill from range; don’t cluster towers near their path |
Boss Enemies and Mechanics
Bosses are the biggest threats in TDS. They appear at specific wave thresholds and can wipe out unprepared defenses.
Standard Bosses
| Boss | Appears On | HP (Normal) | Speed | Ability | Counter Strategy |
|---|---|---|---|---|---|
| Molten Boss | Wave 20+ | Very High | Slow | Leaves a burning trail that damages towers | Place towers away from path edge; use non-fire damage |
| Frost Boss | Wave 25+ | Very High | Slow | Slows nearby towers, reducing fire rate | Place towers further back; use Commander to offset slow |
| Void Boss | Wave 30+ | Extreme | Slow | Absorbs a percentage of incoming damage | Maximum DPS with multiple buffers; burst damage works best |
| Titan | Final Wave | Maximum | Very Slow | Enrages at low HP (faster movement, more HP regen) | Save all DPS for the final phase; don’t overcommit early |
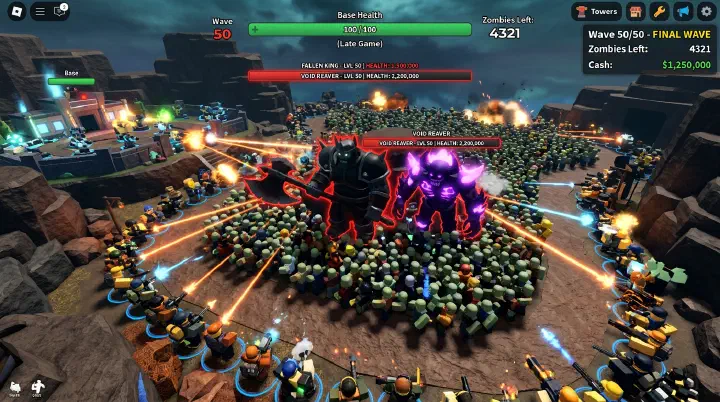
| Fallen King | Fallen Mode Final | Extreme | Medium | Summons minions, has multiple phases | Dedicated minion-clearing towers; phase-based strategy |
Boss Mechanics Explained
| Mechanic | What It Does | How to Counter |
|---|---|---|
| Enrage | Boss gains speed and/or damage when HP drops below 50% | Save burst damage for after enrage; have freezers ready |
| Minion Summon | Boss spawns smaller enemies during the fight | Keep AoE towers in reserve for minion waves |
| Damage Absorption | Boss reduces incoming damage by a percentage | Stack multiple buffer towers to overcome the reduction |
| Tower Debuff | Boss applies negative effects to nearby towers | Place towers at maximum range; use DJ/Commander at a distance |
| Phase Transition | Boss changes behavior at HP thresholds | Plan your strategy for each phase; don’t use all resources on phase 1 |
Enemy HP and Speed Comparisons
HP Tier List (Normal Mode Baseline)
| Tier | HP Range | Enemy Types |
|---|---|---|
| Tier 1 - Minimal | 10-50 HP | Normal, Fast, Ducky |
| Tier 2 - Low | 50-150 HP | Slow, Hidden, Swarm |
| Tier 3 - Medium | 150-500 HP | Tank, Armored, Shielded, Healer |
| Tier 4 - High | 500-2,000 HP | Standard Bosses (Molten, Frost) |
| Tier 5 - Extreme | 2,000-10,000+ HP | Void Boss, Titan, Fallen King |
Speed Tier List
| Tier | Speed | Enemy Types | Threat Level |
|---|---|---|---|
| Very Slow | 1-2 studs/sec | Tank, Bosses | Low (plenty of time to DPS) |
| Slow | 3-4 studs/sec | Normal, Slow, Armored | Low-Medium |
| Medium | 5-7 studs/sec | Fast, Hidden, Healer | Medium |
| Fast | 8-10 studs/sec | Fast variants, Swarm | High (requires fast DPS) |
| Variable | Changes | Teleporter, Enraged Boss | Unpredictable (highest threat) |
How Enemies Scale Across Gamemodes
Gamemode Scaling Multipliers
| Gamemode | HP Multiplier | Speed Multiplier | New Enemy Types | Notes |
|---|---|---|---|---|
| Casual | 0.5x | 0.8x | None | Tutorial difficulty; very forgiving |
| Normal | 1.0x | 1.0x | Standard set | Baseline; all guides reference this |
| Hardcore | 2.5x-3x | 1.3x | Hardcore-only variants | Faster waves, new enemy abilities, tighter economy |
| Fallen | 4x-5x | 1.5x | Fallen-exclusive enemies | Hardest difficulty; requires coordinated team play |
| Molten | 3x | 1.2x | Molten variants | Fire-themed enemies; burn mechanics amplified |
Wave Count Differences
| Gamemode | Typical Wave Count | Boss Waves | Difficulty Spike Waves |
|---|---|---|---|
| Casual | 15-20 | 1 (final) | Wave 15 |
| Normal | 30-40 | 3-5 | Waves 15, 25, 30+, final |
| Hardcore | 40-50 | 5-7 | Waves 10, 20, 30, 40, final |
| Fallen | 50-60 | 8-10 | Every 5 waves after wave 20 |
Wave Patterns for Key Maps
Museum (Normal Mode)
| Wave | Enemy Composition | Threat Level | Key Strategy |
|---|---|---|---|
| 1-5 | Normal enemies only | Very Low | Build economy, place 2-3 Scouts |
| 6-10 | Normal + Slow | Low | Add Farm, upgrade Scouts to Lv2 |
| 11-15 | Normal + Slow + Fast | Medium | Add Pyromancer, prepare for first boss |
| 16-20 | Mixed + Molten Boss (Wave 20) | Medium-High | Focus fire on boss, maintain DPS |
| 21-30 | Mixed + Armored + Tank | High | Add Accelerator, max Commander |
| 31-40 | All types + Final Boss | Very High | All towers maxed, save coins for emergency |
Alien Attack (Normal Mode)
| Wave | Enemy Composition | Threat Level | Key Strategy |
|---|---|---|---|
| 1-5 | Normal + Hidden | Low | Add Radar/detection early |
| 6-12 | Normal + Fast + Hidden | Medium | Fast-firing towers essential |
| 13-20 | Mixed + Alien Boss (Wave 20) | Medium-High | Coordinate team DPS on boss |
| 21-30 | Swarm + Tank + Armored | High | AoE coverage critical |
| 31-40 | All types + Final Alien Boss | Very High | Full team coordination required |
Badlands (Normal Mode)
| Wave | Enemy Composition | Threat Level | Key Strategy |
|---|---|---|---|
| 1-8 | Normal + Slow (dual path) | Low-Medium | Cover both paths evenly |
| 9-15 | Fast + Tank (dual path) | Medium | Balance DPS between paths |
| 16-25 | Mixed + Boss | High | Central buffer tower placement |
| 26-40 | All types + Final Boss | Very High | Max everything, no room for errors |
2026 Update: Enemy Changes
The 2026 balance update introduced several enemy adjustments that affect strategy:
Buffs (Stronger Enemies)
| Enemy | Change | Impact |
|---|---|---|
| Tank | HP increased by 15% | Requires more DPS to defeat; plan for extended boss fights |
| Armored | Armor damage reduction increased from 30% to 40% | Pyromancer and high burst damage even more important |
| Swarm | Group size increased from 8-10 to 12-15 | AoE coverage is now essential, not optional |
| Frost Boss | Slow aura radius increased by 20% | Tower placement needs more distance from boss path |
Nerfs (Weaker Enemies)
| Enemy | Change | Impact |
|---|---|---|
| Fast | Speed reduced by 10% | Slightly more forgiving for early-game setups |
| Healer | Healing rate reduced by 20% | Less urgent to eliminate immediately, but still priority |
| Normal (early waves) | HP slightly reduced | Easier early game economy building |
New Enemy Types (2026)
| Enemy | HP | Speed | Ability | Best Counter |
|---|---|---|---|---|
| Corrupted | High | Medium | Corrupts nearby towers, reducing their damage by 25% | Electroshocker (purges corruption), ranged towers |
| Phantom | Medium | Fast | Phases in and out of visibility; only takes damage when visible | Towers with persistent damage (burn, DoT effects) |
| Splitter | Medium | Medium | Splits into 2 smaller enemies when killed | AoE damage to clean up the split enemies |
Enemy-Specific Counter Strategies
Countering Specific Enemy Types
| Enemy Type | Worst Towers Against It | Best Towers Against It | Reasoning |
|---|---|---|---|
| Burn-Immune | Pyromancer, Golden Pyromancer | Accelerator, Rocketeer, Electroshocker | Fire damage is completely negated |
| Stun-Resistant | Freezer, Electroshocker | Accelerator, Sniper, Assassin | Crowd control is unreliable; raw DPS wins |
| Armored | Scout, basic damage towers | Pyromancer (burn ignores armor), Rocketeer | Armor reduces flat damage; percentage-based effects work |
| Swarm | Sniper, single-target towers | Mortar, Pyromancer, Rocketeer | Single-target can’t keep up with group size |
| Hidden | All towers without detection | Radar + any damage tower, Commander (reveals) | Must detect before you can damage |
| Healer | Slow-firing towers | Accelerator, Sniper (burst to out-heal) | Must kill faster than the healer can sustain |
| Teleporter | Path-dependent placement | Dense, overlapping tower coverage | No safe gaps for teleporters to exploit |
Boss-Specific Strategies
| Boss | Key Weakness | Tower Combo | Placement Tips |
|---|---|---|---|
| Molten | Vulnerable to burst damage | Accelerator + Commander + Rocketeer | Keep towers 2+ tiles from path |
| Frost | Vulnerable to fire rate buffs | DJ + Accelerator + Pyromancer | Place buffers far from boss slow aura |
| Void | Vulnerable to sustained DPS | 2x Commander + Accelerator + Golden Cowboy | Overlap all tower ranges on boss spawn point |
| Titan | Weak before enrage phase | Save coins, burst after 50% HP | Don’t overcommit DPS in phase 1 |
| Fallen King | Vulnerable during phase transitions | Full team coordination, dedicated minion clear | Assign roles: DPS, minion control, support |
Frequently Asked Questions
What’s the hardest enemy type in TDS?
The Void Boss in Normal mode and the Fallen King in Fallen mode are generally considered the most difficult. The Void Boss’s damage absorption mechanic requires perfectly optimized DPS, while the Fallen King has multiple phases and summons minions.
How do I counter burn-immune enemies?
Use non-fire damage towers: Accelerator for sustained DPS, Electroshocker for stun + damage, or Rocketeer for AoE burst. Never rely on Pyromancer against burn-immune waves.
Do enemies get stronger in co-op mode?
Yes. Enemy HP and sometimes spawn rates scale with the number of players. In a 6-player lobby, enemies have significantly more HP than in solo play. Coordinate your tower setup with your team.
What’s the difference between Normal and Hardcore enemies?
Hardcore enemies have 2.5-3x more HP, 1.3x speed, and some enemies gain new abilities not present in Normal mode. Waves also come faster, giving you less time to build between them.
How do I handle swarm enemies?
AoE towers are essential. Pyromancer, Mortar, and Rocketeer can handle large groups efficiently. Don’t waste single-target towers on swarms unless you have no other option.
What changed for enemies in the 2026 update?
Tanks got a 15% HP buff, Armored enemies have 40% damage reduction (up from 30%), Swarm groups are larger (12-15 instead of 8-10), and three new enemy types were added: Corrupted, Phantom, and Splitter.
Can I skip waves?
No. You must defeat all enemies in each wave to advance. However, you can use the “start next wave” button in some modes if all enemies are defeated early.
What’s the best way to learn enemy patterns?
Play Casual mode first to observe enemy behavior without pressure. Then progress to Normal mode and study each wave. The TDS Wiki also has detailed enemy pages with stats.
Next Steps
- TDS Beginner Guide — Complete walkthrough for new players
- TDS Towers Tier List — Complete ranking of every tower in the 2026 meta
- TDS Best Maps Guide — Strategy for every map
- TDS Codes Guide — All active codes for free crates and rewards
- TDS Hardcore Mode Guide — How to survive the hardest difficulty
- TDS Fallen Mode Guide — Complete strategies for Fallen mode
- TDS Strategy Guide — Advanced tactics, combos, and pro techniques
- Browse all guides — Visit our guides page
Disclaimer: This guide is based on the Tower Defense Simulator game state as of May 2026. Game updates may change enemy stats, wave compositions, add new enemies, or adjust boss mechanics. Always check the official TDS Wiki for the most up-to-date information.
Sources: