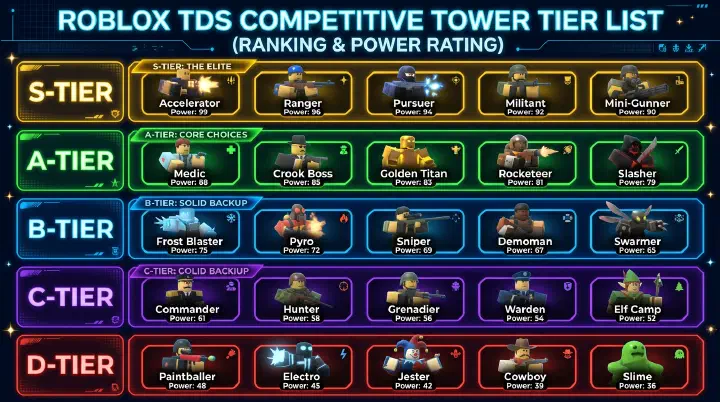
Last updated: August 18, 2026. Rankings reflect the v2.3.0 update, which added the Kingpin evolved tower and the Boomerang tower.
How This Tier List Works (And What Changed in v2.3.0)
You’re staring at the shop, and two new names are sitting there: Kingpin and Boomerang. You don’t know where they fit, whether they’re worth 15,000 coins, or if they replace something you already own. That’s the exact moment this list is for.
The v2.3.0 update dropped on July 27, 2026, and it changed the meta in a quiet way. It didn’t rework every tower the way the earlier 2026 balance patch did. Instead it added one heavy hitter — Kingpin, an evolved tower that turns Crook Boss into a summoning and economy machine — and one budget pick, Boomerang, a pierce-based starter. The interesting part isn’t just that they’re new. It’s that their arrival shifted the value of towers you already own.
Here’s how the tiers break down. S+ means “game-defining.” S means “core loadout.” A means “strong and reliable.” B means “situational.” C means “early game only.” D means “skip it.” We rank towers on how they perform across Normal, Hardcore, and Fallen, not on one map or one wave.
| Tier | What it means |
|---|---|
| S+ | Game-defining. You build your whole plan around these. |
| S | Core of most winning loadouts. |
| A | Strong and viable in all modes with good placement. |
| B | Situational. Good on specific maps or in specific comps. |
| C | Early game only. Replace these by the mid-game. |
| D | Skip. Outperformed by almost everything else. |
Before we get into the tiers, a quick note on how to actually read a tier list: a B-tier tower placed on an inside corner beats an S-tier tower placed on a dead straight. Placement beats rating every time. If you want the map-by-map version of that idea, check the TDS Best Maps Guide. If you want to know which towers multiply each other, the TDS Strategy Guide covers the combo side.
S+ Tier: The Towers You Can’t Skip
There are only three towers in S+, and they’re here for different reasons.
Accelerator is the raw damage king. It has the highest DPS in the game, and nothing else is close. You see a molten boss on wave 40 with a mountain of health, and two maxed Accelerators just chew through it while everything else plinks away. Its placement limit is the only thing keeping it fair. Save for it early, place it late, and it’s the reason your Fallen runs survive.
Commander is the best buffer in the game. A maxed Commander cranks the fire rate and damage of everything around it. One Commander buffing two Accelerators does more than a third Accelerator ever would. That’s not hyperbole — it’s just how buffs stack.
Golden Pyromancer stays in S+ because its burn damage is infinite and its range is huge. Burn immunity is more common now, which is exactly why Electroshocker climbed, but Golden Pyro’s raw DPS keeps it relevant on the maps that still have burnable crowds. If you own it, it’s in most of your loadouts.
The scene to remember: wave 35, enemies are stacking up in a cluster, and your Golden Pyro’s fire zone melts the whole pile before it reaches your Accelerators. That’s S+ in action — it’s not one number, it’s a whole lane solved.
S Tier: Core Loadout Towers (Plus the New Kingpin)
S tier is where your loadout actually gets built. These towers aren’t as game-defining as S+, but they’re the backbone you’ll reach for over and over.
Electroshocker is the burn-immune answer. When the 2026 update made more enemies immune to burn, Electroshocker got the indirect buff everyone felt. It stuns groups, deals consistent damage, and locks down an area. It’s often the pick over Golden Pyro now.
Golden Scout is the best early-to-mid tower in the game. Fast fire rate, cheap upgrades, and it scales into the late game without falling off a cliff. If you have it, it’s your opener on nearly every Normal and Fallen map.
Golden Cowboy is the reliable all-rounder. Consistent DPS from wave 1 to the end, no range issues, no weird falloff. It’s not flashy, but it never stops working.
Rocketeer is the boss-wave AoE. Massive splash damage, placement limit of 5, and it melts grouped bosses when you can place them. Its only drawback is that limit.
DJ is the second buffer. It boosts fire rate for nearby towers and stacks with Commander for the classic double-buffer setup.
And then there’s Kingpin, the new S-tier entry. Kingpin evolves from Crook Boss at level 20 and costs 15,000 coins and 5,500 gems to unlock, with a $3,600 placement cost and a limit of 4. Here’s the scene that explains why it’s S tier: it’s wave 18, you’ve got a wall forming, but you’re bleeding cash on upgrades. You drop a Kingpin, run the bottom path first to unlock Bouncers — melee summons with huge DPS and health that also detect hidden and lead enemies — and suddenly your early line holds while the Money Runner summons print bonus cash when they die.
That’s the Kingpin identity: it’s a defense and economy hybrid in one tower. The bottom path is your frontline (Bouncers, then the long-range Contractor sniper at level 6B). The top path is your income (the bounty mechanic marks an enemy so it pays out extra cash on kill). Bottom first, top later. Over a long match, a maxed Kingpin’s summons can out-damage a traditional tower just by staying active the whole time. For the full build order, read the Kingpin Tower Guide.
A Tier: Strong, Reliable, and Sometimes Situational
A tier is full of towers that are genuinely good but don’t define a strategy the way S tier does.
Pyromancer is the budget Golden Pyro. Great burn crowd control, less effective against burn-immune enemies. Still a staple in most Normal compositions.
Mortar is your cluster-damage workhorse. It caught a nerf in the 2026 balance update and slid from S to A, but it still clears grouped enemies well and has a strong early presence. It’s not the best AoE anymore, but it’s nowhere near dead.
Freezer is the speed control you don’t appreciate until you need it. On Hardcore, enemy speed can overwhelm your defense in seconds. Freezer slows them enough for your damage towers to catch up. In Normal mode it’s optional; in Hardcore and Fallen it’s close to mandatory.
Golden Crook Boss is strong damage with good range. It’s worth noting that regular Crook Boss got a quiet promotion this update — since Kingpin evolves from it at level 20, leveling Crook Boss now has a payoff beyond itself. Golden Crook Boss stays A tier on its own merits.
Golden Minigunner and Golden Soldier are solid, reliable damage. They’re slightly outclassed by Golden Cowboy but still perfectly viable. Ace Pilot rounds out A tier as the best starter you can buy with coins, with excellent early DPS and good range.
The scene here: you’re on Fallen mode, wave 12, and a cluster of fast enemies is about to slip past your Pyromancer. You drop a Freezer and the whole wave slows to a crawl, giving your damage towers an extra three seconds. A tier isn’t about carrying — it’s about plugging the exact gap your S tier leaves open.
B and C Tier: When to Reach for These
B tier is situational, and C tier is early game. The mistake most players make is treating both as “garbage.” They’re not. They’re tools with narrow jobs.
B tier standouts: Sniper for highest single-shot damage against bosses (slow fire rate, poor against groups). War Machine for strong late-game AoE, though it’s expensive to max. Brawler and Assassin for close-range and single-target burst. Electrician as a third-string buffer. Supply Drop for bonus economy when Farm isn’t enough. Hunter for mid-game single-target work.
C tier is your starter pack. Scout is your free opening tower — replace it with Golden Scout or Ace Pilot the moment you can. Farm prints passive income but deals zero damage. Gunner, Pursuer, Demoman, and Ranger are all fine early and outclassed later.
Now, the new Boomerang lands in C tier, and it’s the most interesting budget pick in a while. Here’s why: it’s a 300-coin beginner tower with flying detection at every level and lead detection from level 3. It throws one boomerang that pierces up to three enemies, upgraded to two boomerangs and five max hits by level 4. It’s basically a cheaper, friendlier version of Executioner’s piercing style.
The scene: you’re on wave 8, and flying enemies are slipping past your Scout because it can’t target them. Boomerang has flying detection from the start, so it catches them while your Scout handles ground. That alone puts it above Demoman for the first 20 waves. The catch? No hidden detection, and the boomerang has to travel back before the next throw, so attack-speed buffs do less for it. It’s a great opening pick, and you swap it out by mid-game.
D Tier: Towers to Skip (And Why You Still See Them)
D tier exists because not every tower can be good. Melee has the shortest range in the game and enemies walk past it before it swings. Paintballer is outclassed by every other damage tower. Turret fires slowly for low damage and dies off after the early waves.
You’ll still see these in low-level lobbies, and that’s fine — new players haven’t unlocked better options yet. The trick isn’t to flame them for it. It’s to recognize that a D-tier tower is a placeholder, not a strategy. Replace it the second you have the coins for anything in C or above.
The v2.3.0 Shakeup: What Moved and Why
Here’s the honest summary of what the v2.3.0 update actually did to the rankings. Two towers are new, one tower got a quiet promotion, and one slid down a peg. No official numeric buffs or nerfs to the existing cast were confirmed for v2.3.0 — the movement is about roles, not stats.
| Tower | Change | Why |
|---|---|---|
| Kingpin | New — S tier | Hybrid economy + summon tower with hidden-detection summons. Bottom path first for Bouncers. |
| Boomerang | New — C tier | Cheap pierce starter with flying detection. Outclasses Demoman early, no hidden detection late. |
| Crook Boss | Promoted in value | Now evolves into Kingpin at level 20, so leveling it has a late-game payoff. |
| Demoman | Slid to bottom of C | Boomerang does its early-wave job better and cheaper. |
| Golden Crook Boss | Unchanged — A tier | Still strong, now competes with Kingpin for the mid-game economy/summon niche. |
The scene that ties it together: you’re deciding between leveling Crook Boss to 20 for the Kingpin unlock or spending that money on an Accelerator you already know works. That’s a real choice now, and it’s the kind of decision the old meta didn’t ask you to make. We get into that below.
Loadouts by Mode: What to Actually Build
A tier list is only useful if it turns into a loadout. Here’s what that looks like per mode.
Normal mode. You can win Normal with almost anything, but the smooth route is: open with Golden Scout or Ace Pilot (4-6 of them), add 2-3 Pyromancers for crowd control, one Commander to buff, one Farm for economy, and save for an Accelerator as your late-game boss killer. If you don’t have Accelerator, Golden Cowboy fills the boss-killer slot fine.
Hardcore mode. This is where Freezer stops being optional. Run 2 Accelerators as primary DPS, 2 Golden Pyromancer or Electroshocker for AoE, a Commander plus DJ for the double buff, 2 Freezers to slow the swarm, and one Rocketeer for boss-wave cleanup. Enemy speed is the killer here, and Freezer is the counter.
Fallen mode. Fallen is the check on whether your economy and your damage are balanced. Three Accelerators for max DPS, two Electroshockers for stun plus burn-immune damage, Commander and DJ for the buff stack, two Rocketeers for AoE boss damage, and one Freezer for speed control.
The scene: you’re in Hardcore, wave 29, and the mob is moving faster than your Accelerators can reload. You check your Freezer count — if it’s less than two, that’s your loss condition. Fix it before the wave starts, not after.
The Fallen Mode Wipe: A Failure Review
Let’s talk about the run you keep losing. You get to Fallen wave 30, your economy looks great, you’ve got three Accelerators and a maxed Commander, and then a wave of fast hidden enemies shreds your lane before you can react. You’ve been there. Here’s what actually went wrong.
The mistake wasn’t the final wave. It was wave 14. You saw your income stacking up and decided to “greed” — you kept farming instead of adding a second crowd-control tower. Then a burst of fast enemies hit at wave 16, you panic-placed a Freezer in a dead straight, and it barely slowed anything because it was out of position. You limped through, but your economy rhythm was broken, and by wave 30 you were one tower short of the DPS you needed.
The failure chain is: greed early → panic mid → under-DPS late. Every time. The recovery strategy is to flip it. When you see your income spike around wave 14, spend it on a second crowd-control tower before the fast wave, and put that Freezer on an inside corner where its slow actually covers the whole lane. A Freezer on a straight covers one tile. A Freezer on an inside corner covers the whole turn. That single placement change is the difference between a wipe and a win.
The $6,000 Question: A Decision Framework
Here’s the two-way door every mid-game Fallen run hits. You’ve got $6,000 sitting there on wave 17. Do you (A) finish maxing your Kingpin’s top path for the bounty income, or (B) drop that money into a second Accelerator?
The instinct is B, because Accelerator is S+ and “S+ always wins.” But here’s the counterintuitive read: on wave 17, your income engine matters more than your damage ceiling. A second Accelerator you can’t fully upgrade yet just sits there half-built. Kingpin’s top-path bounty pays out extra cash on every marked kill, and that income compounds over the next ten waves — cash you’ll spend on the third Accelerator at wave 28.
So the framework is: early to mid-game, buy economy when your damage already holds the lane. Late game, buy damage when your economy is already printing. The tower tier tells you what’s strong; the wave number tells you which strong thing to buy right now.
Counterintuitive Advice That Wins You Games
The single most useful thing I can tell you is this: a half-upgraded S+ tower is worse than a fully-upgraded A tower. It looks like you should rush Accelerator the second you can afford one, because it’s S+. What you should actually do is hold that cash until you can afford an Accelerator and its key upgrades, and meanwhile max the A-tier tower you already have down.
Here’s the specific version: on Fallen wave 22, a maxed Golden Minigunner out-performs a level-2 Accelerator you can’t afford to upgrade yet. The tier list ranks the ceiling, not the path. You live or die on the path.
The second counterintuitive tip: farm towers don’t win games, but they lose them if you over-invest. Two Farms early is fine. Six Farms because “economy is king” means you’re walking into wave 25 with no damage and a pile of coins you’ll never have time to spend. Economy is a multiplier, and a multiplier of zero damage is still zero.
Final Tips That Actually Stick
- Placement beats tier. A B-tier tower on an inside corner out-damages an S-tier tower on a straight. Always.
- Buffers multiply, they don’t add. One Commander buffing two Accelerators beats three unbuffed Accelerators. Same for DJ.
- Upgrade in stages. Don’t max one tower before placing the rest. A balanced board beats one god tower and four empty slots.
- Save for late. Accelerator and Rocketeer need real investment. Don’t blow your whole wallet on mid-game sidegrades.
- Know the lane. Inside corners get more uptime than straights, full stop. Study the map before you place.
And if you’re new to all of this, start with the TDS Beginner Guide. It walks you through your first win without assuming you know what a “lane” is.
Disclaimer: Tier rankings reflect community consensus and testing as of August 2026, including the v2.3.0 update. Tower stats can change with any patch. For exact numbers, check the official TDS Wiki.
Sources: